
Dashboard Phone Mount Adhesive Installation
Dashboard phone mount adhesive installation refers to a no-drill mounting method where an adhesive pad and mounting plate are bonded directly onto a vehicle dashboard surface to support a phone holder. The outcome of this setup depends on surface condition, adhesive type, contact area quality, curing time, phone weight, and heat exposure inside the car.
This installation method is typically more suitable when the dashboard surface is smooth, clean, and provides consistent contact for the adhesive base. Performance may become less stable on textured or highly curved dashboards, or in environments with higher interior heat, especially when combined with heavier phones or long mounting arms that increase leverage on the bond.
In most cases, the process relies on controlled preparation and alignment before any full load is applied. The adhesive pad is placed on a prepared dashboard area, pressed to ensure even contact, and then left to cure so the bond can stabilize before the phone is mounted. Early stability depends on how well the surface, alignment, and pressure conditions are managed during this phase.
Because this is a surface-dependent installation method, results can vary across different vehicle interiors and mounting positions. Careful attention to dashboard material, contact quality, and load expectations helps maintain a more predictable bond, while premature loading or poor surface compatibility can reduce stability during early use.
Adhesive Mount Fit and Dashboard Surface Requirements
Adhesive mount fit depends on dashboard surface condition, adhesive base compatibility, mounting plate contact, and expected load. These factors determine whether the bond can form consistent contact and maintain stability during use.
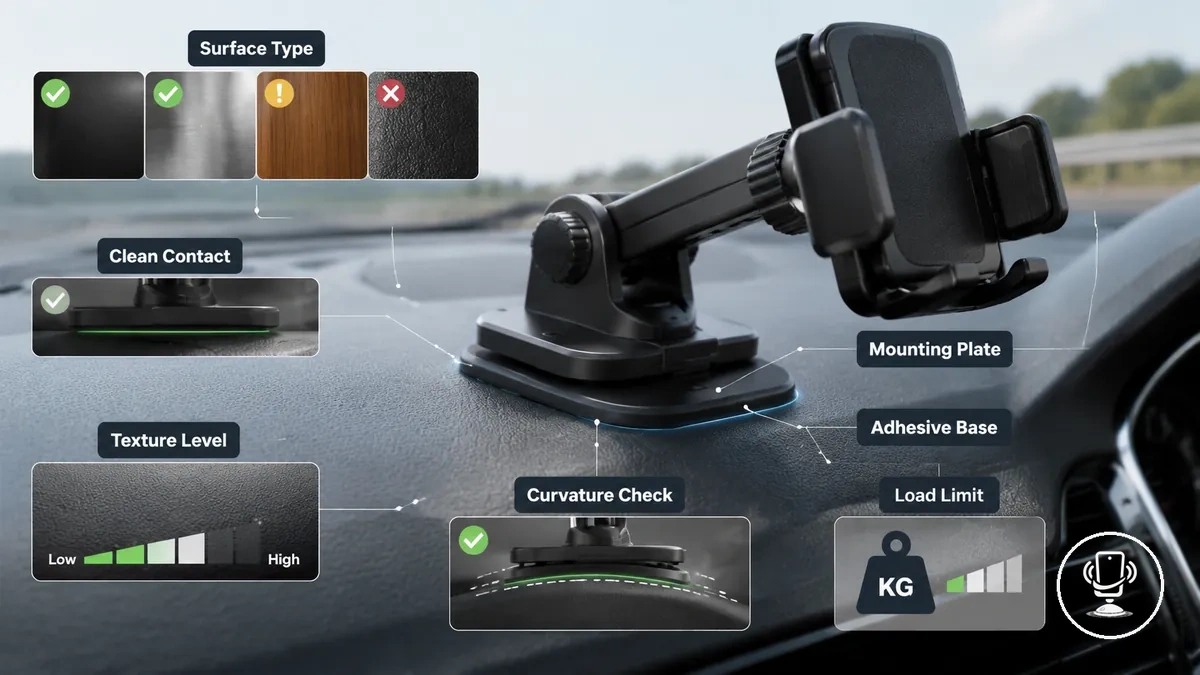
Dashboard surface texture, curvature, and cleanliness directly influence how evenly the adhesive base can bond. Smooth and clean areas typically allow more consistent contact, while textured or heavily curved surfaces may reduce contact area and create uneven bonding points that affect stability over time.
Understanding fit requirements before installation helps prevent weak adhesion and early instability. The adhesive pad size, mounting plate footprint, and dashboard contact area must align closely enough to support the intended load without creating edge lift or uneven pressure zones.
- Smooth dashboard surface improves full adhesive contact and reduces edge lift risk
- Textured surface can reduce bonding consistency due to limited contact points
- Curved areas may weaken adhesion by reducing flat contact area coverage
- Clean, residue-free surface supports stronger initial bonding conditions
- Adhesive pad size must match mounting plate footprint for balanced pressure distribution
- Heavier phone setups increase load stress on the adhesive base over time
- High heat exposure can gradually reduce adhesive stability depending on material type
Load expectations also matter because heavier phones or longer mounting arms can increase leverage on the adhesive base, especially when combined with curved or textured dashboards. Heat exposure inside the vehicle may further influence long-term bond stability depending on surface material and adhesive type used.
Some dashboard layouts may require a mounting plate or a different mounting method without expanding into alternatives, which is why broader compatibility considerations are often reviewed before installation through the car phone mount hub context.
Smooth, Textured, and Curved Dashboard Surfaces
Smooth, textured, and curved dashboard surfaces define how adhesive contact forms between the dashboard and the adhesive base, making surface geometry a key factor in adhesion consistency. Surface type directly influences contact area, texture depth, curve severity, and the likelihood of edge lift during use.
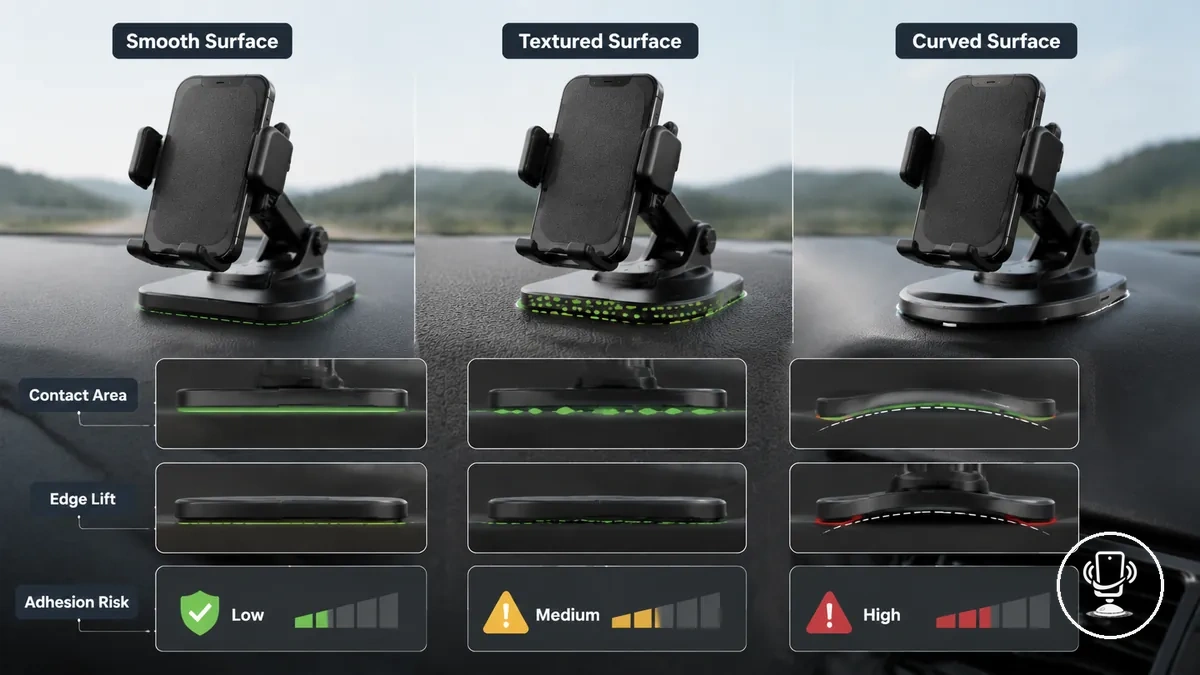
Smooth dashboard surfaces allow the adhesive base and mounting plate to maintain more uniform contact because the surface provides fewer interruptions in bonding. Textured dashboards introduce gaps caused by surface depth variations, which reduce continuous adhesion points. Curved dashboards further limit effective contact area depending on curve severity, often concentrating pressure at edges instead of distributing it evenly.
The differences in surface behavior can be summarized through contact efficiency and adhesion risk:
| Surface type | Contact condition | Adhesion risk | Installation decision |
|---|---|---|---|
| Smooth dashboard | High and even contact area | Lower risk of edge lift | Generally suitable |
| Textured dashboard | Interrupted contact due to texture depth | Moderate risk depending on depth | Depends on adhesive base flexibility |
| Curved dashboard | Reduced flat contact zone | Higher risk with stronger curvature | Requires careful fit evaluation |
Overall adhesion performance depends on how well the adhesive base can conform to the surface profile of the dashboard. When texture depth or curve severity increases, the effective contact area typically decreases, which can raise the likelihood of instability under load.
Adhesive Pad and Mounting Plate Compatibility
Adhesive pad and mounting plate compatibility depends on how the pad diameter, mounting plate structure, and adhesive base align with the mount base and dashboard contact area. Compatibility is determined by fit consistency, load distribution, and whether the combined components maintain stable contact under use conditions.
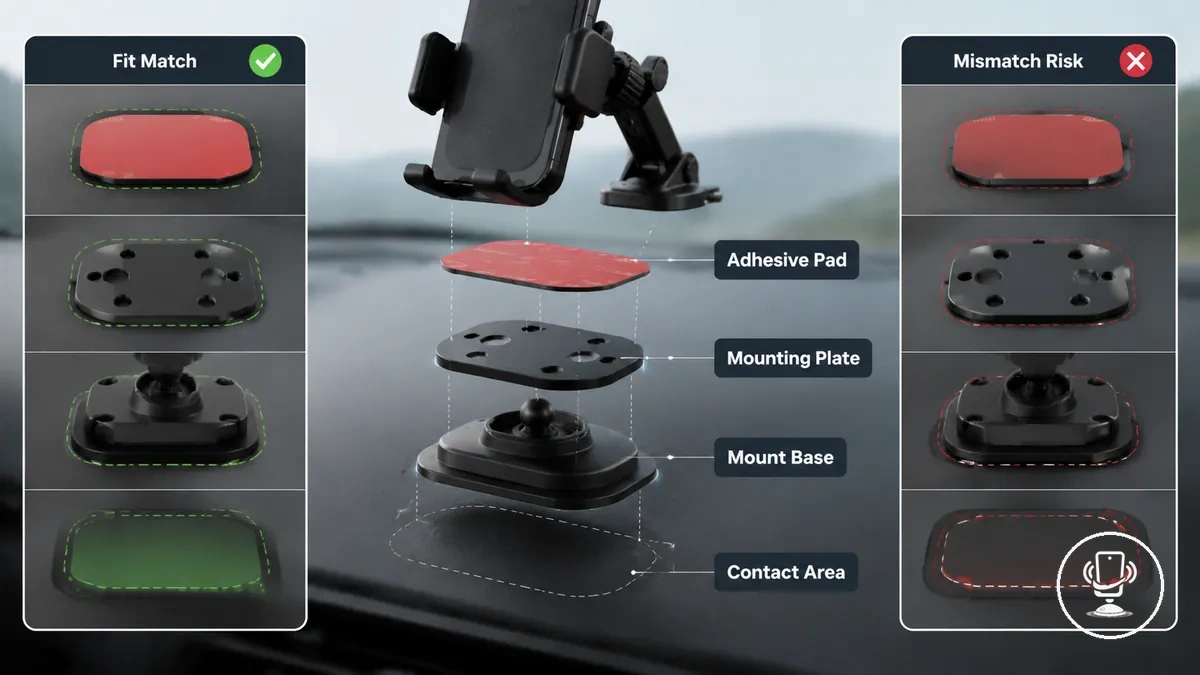
A mismatch can occur when the adhesive pad size does not match the mount base footprint, or when the mounting plate stiffness prevents even pressure across the dashboard contact area. In these cases, the adhesive layer may not distribute force evenly, which can reduce stability depending on load and surface interaction.
Compatibility can be evaluated through key component relationships:
- Pad diameter vs mount base determines contact coverage and alignment consistency
- Mounting plate stiffness influences how evenly pressure spreads across the adhesive layer
- Adhesive layer type affects bonding behavior under different load conditions
- Dashboard contact area size limits how fully the base can seat against the surface
- Phone-holder weight increases stress on both pad and plate alignment stability
Overall compatibility depends on how these components interact as a system rather than individually, with better alignment between pad, plate, and base generally supporting more stable adhesion behavior under varying load conditions.
No-Drill Adhesive Setup Limits
A no-drill adhesive setup is limited by how much load the adhesive pad can safely support on a dashboard surface without mechanical fixing. While it avoids drilling into the interior, its reliability depends on surface condition, removable adhesive performance, and how evenly weight is distributed across the mounting area.

Performance limits become more noticeable when the dashboard is textured or slightly curved, or when a heavier phone increases long-term stress on the adhesive layer. In these conditions, the bond may rely more on surface contact consistency, which can vary depending on temperature, placement, and repeated use over time.
Caution: Adhesive mounts in no-drill setups may gradually lose stability if exposed to higher load or uneven dashboard contact.
- Removable adhesive pad may weaken with repeated repositioning
- Textured dashboard surfaces can reduce consistent bonding area
- Heavier phones increase long-term stress on adhesive layer
- Uneven contact may raise risk of edge lift over time
No-drill adhesive setups are understood as conditional mounting solutions where stability depends on surface quality, load level, and long-term adhesion behavior rather than permanent mechanical fixation.
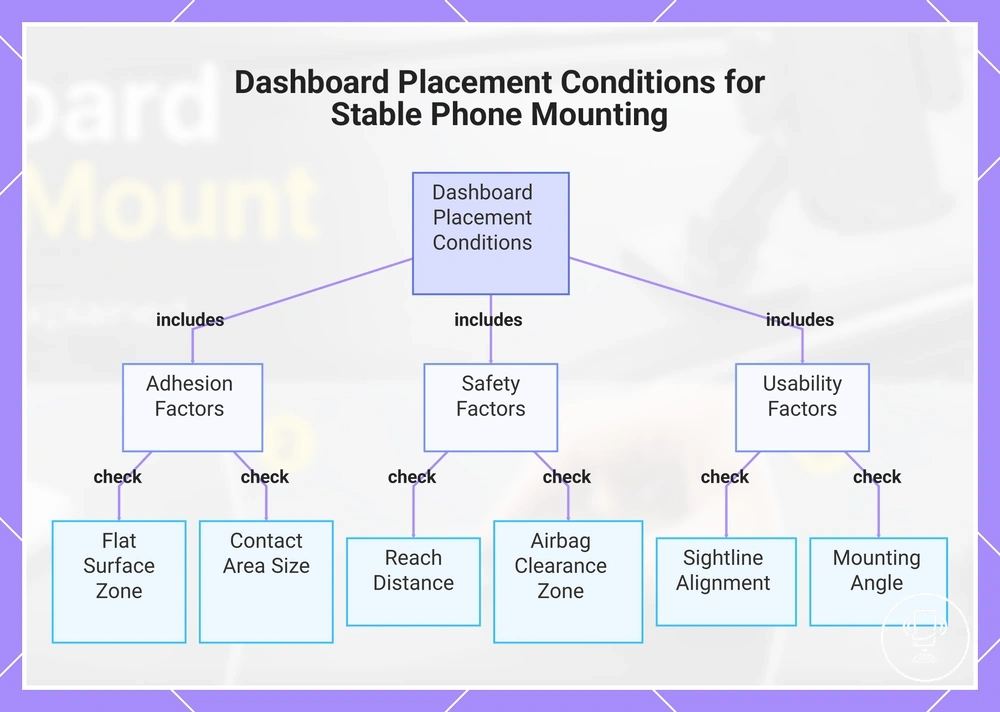
Dashboard Placement Conditions for Stable Phone Mounting
Dashboard placement depends on balancing stable adhesive contact with safe phone access, where reach, sightline, flatness, angle, cable access, airbag clearance, and contact area all influence overall mounting stability.
In compact dashboards or curved interior layouts, placement choices often shift toward positions that keep the phone within natural reach and clear sightlines, while avoiding overextended arm movement or obstructed interaction zones that can reduce both usability and mounting consistency.
Flat dashboard sections generally support stronger adhesive bonding because they allow more uniform contact, while angled or uneven surfaces may reduce adhesion consistency. Higher dashboard positions exposed to heat may also influence long-term bonding behavior, especially when combined with load and repeated adjustments.
Placement decisions also relate to heat and adhesion durability as a condition factor that can affect long-term stability under temperature variation and continuous dashboard exposure.
Placement checklist:
- Reach distance — supports safe interaction without overextending from driving position
- Sightline alignment — maintains visibility without blocking road focus areas
- Flat surface zone — improves adhesive contact consistency and reduces edge lift risk
- Mounting angle — affects screen readability and long-term stability under load
- Cable access path — reduces strain on charging connection during use
- Airbag clearance zone — avoids interference with safety deployment areas
- Heat exposure level — influences adhesive performance over time
- Contact area size — determines how securely the mount base adheres to the dashboard
This chart groups the key conditions for stable dashboard phone mounting into three categories: adhesion, safety, and usability factors.
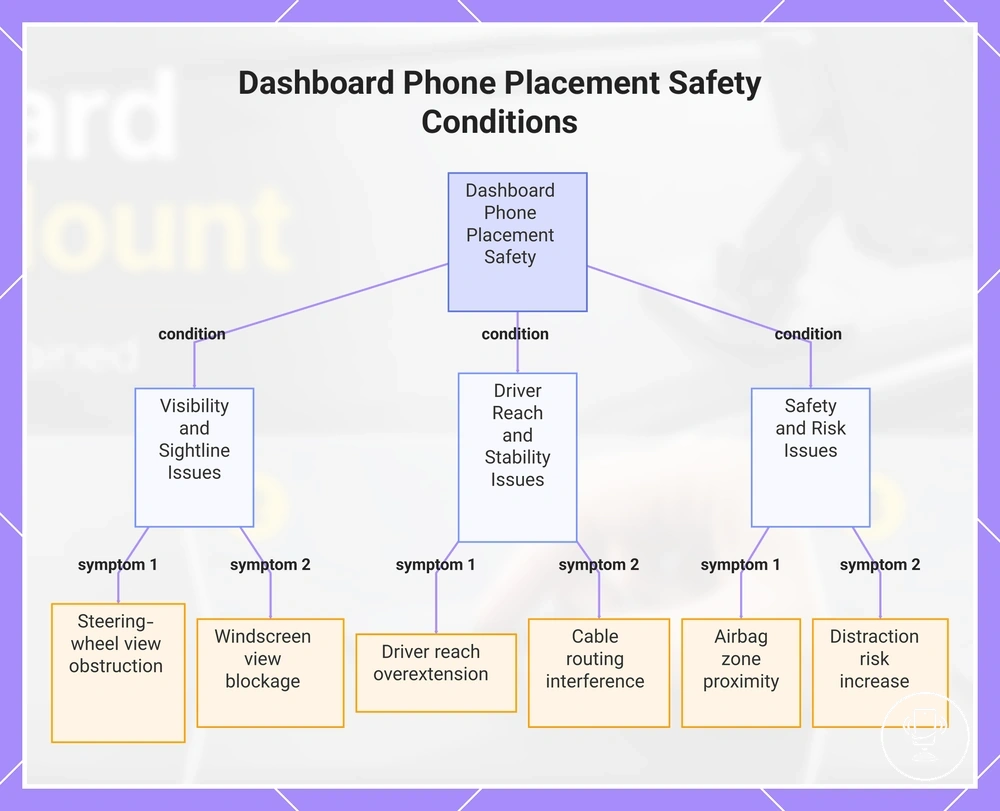
Reach, Visibility, and Driving Sightline
Reach, visibility, and driving sightline define the local safety conditions for positioning a phone on the dashboard so it remains accessible without blocking forward road view or increasing interaction-related distraction.
These conditions depend on how the device position interacts with steering-wheel view, windscreen view, and driver seating reach, especially in compact dashboards where small placement shifts can affect visibility or require overextension from the driver’s normal position.
To keep placement practical, reach must stay within natural arm movement, while sightline should remain clear of critical forward view zones. Cable routing, airbag zones, and screen angle can also influence whether the setup stays stable and visually unobtrusive in real use conditions.
- Steering-wheel view obstruction — may reduce road awareness and increase distraction risk during interaction
- Windscreen view blockage — can limit forward visibility depending on mounting height and angle
- Driver reach overextension — can reduce control stability when the device is placed too far away
- Cable routing interference — may pull or shift the mount, affecting stable positioning
- Airbag zone proximity — can introduce risk if placement overlaps deployment areas
- Distraction risk increase — may occur when visibility and interaction compete for attention
This chart breaks down the key safety conditions for dashboard phone placement, focusing on visibility, reach, and risk factors.
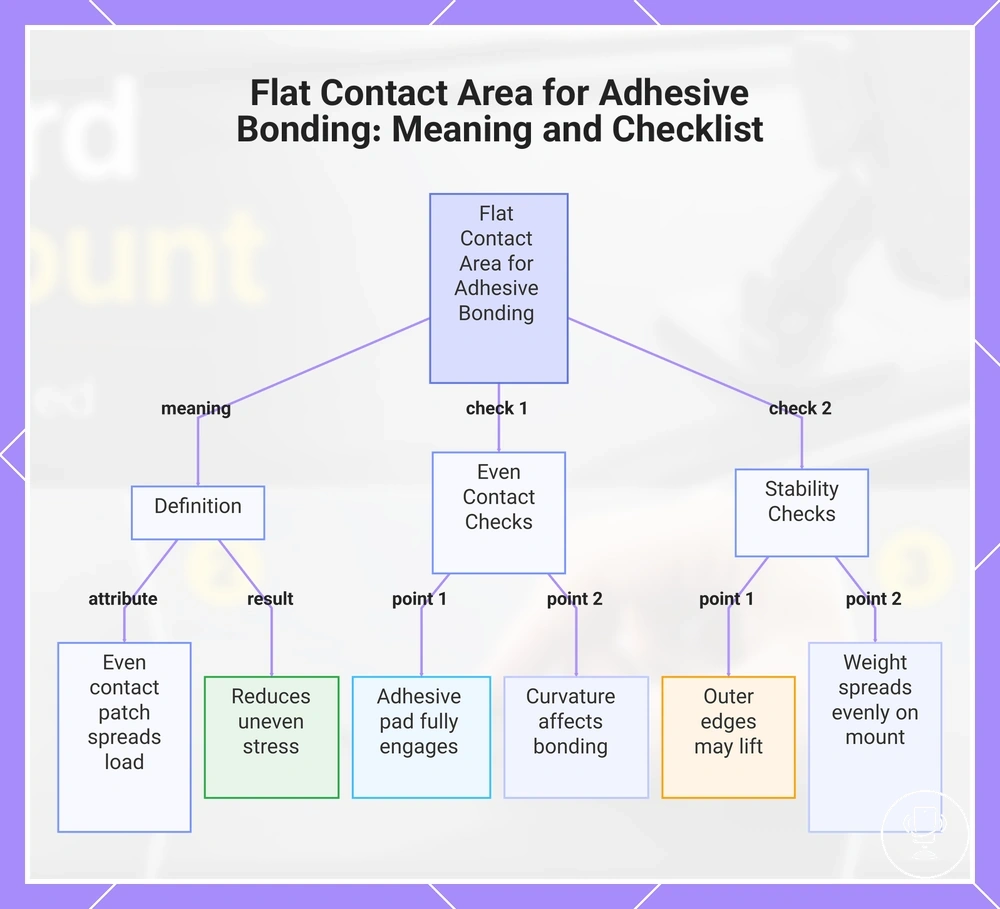
Flat Contact Area for Adhesive Bonding
Flat contact area for adhesive bonding refers to the requirement that the chosen dashboard point provides enough even surface contact for the adhesive pad and mount base to adhere without relying on only partial or edge-level pressure.
When adhesive bonding occurs on a sufficiently flat contact area, the contact patch spreads evenly across the mount footprint, reducing uneven stress. When the surface is slightly curved or inconsistent, bonding may concentrate at edges, which can increase edge lift and reduce overall stability depending on load and mount design.
Mini-checklist for Flat Contact Area for Adhesive Bonding:
- Contact patch size — confirms whether the adhesive pad fully engages the dashboard surface
- Edge lift risk — checks if outer edges are lifting due to surface curvature
- Surface curve level — evaluates how much curvature affects bonding consistency
- Base pressure distribution — ensures weight is spread evenly across the mount base
- Mount footprint match — verifies alignment between pad size and usable contact zone
This chart defines flat contact area for adhesive bonding and outlines the key checks for even contact and stability.
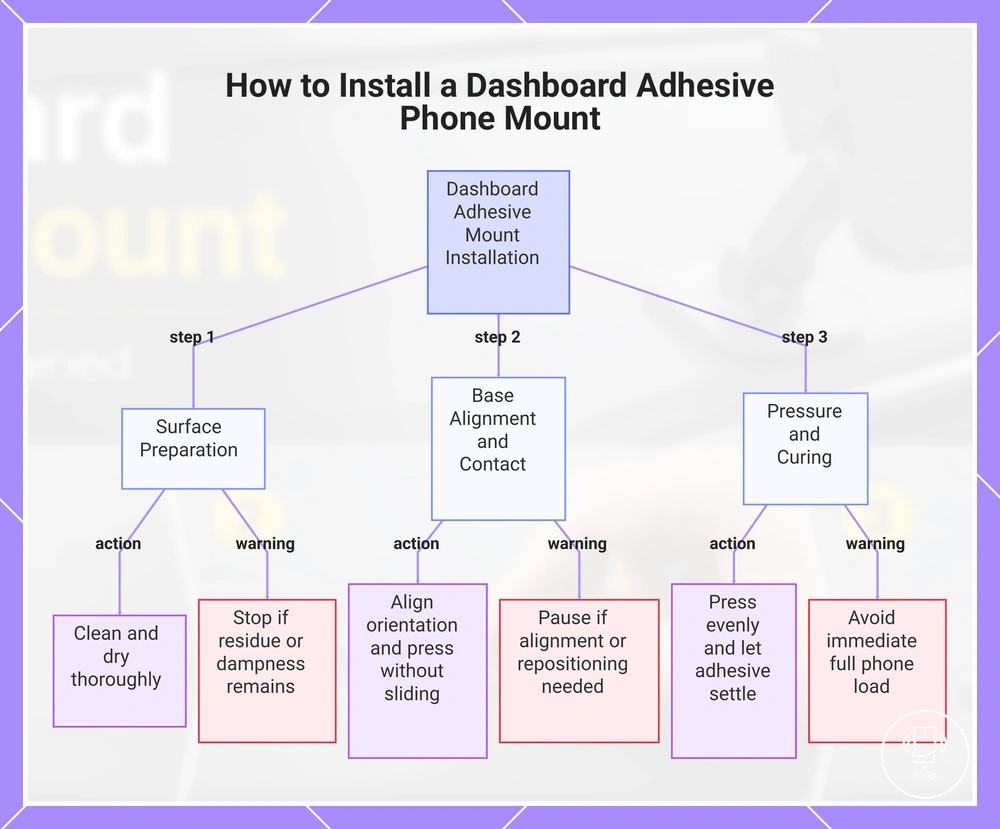
How to Install the Dashboard Adhesive Phone Mount
Installing a dashboard adhesive phone mount depends on correct sequencing of cleaning, alignment, pressure, and curing, since each stage directly affects how well the adhesive bonds to the dashboard surface.
For alternative positioning considerations when dashboard placement is limited, the vent clip mounting guide provides a reference for comparing mounting approaches before final installation decisions are made.
The installation process should follow a controlled order because premature loading or poor alignment can reduce contact quality and weaken the adhesive bond over time. Each step builds stability through surface preparation and gradual pressure application.
Follow the sequence below to install the dashboard adhesive phone mount:
- Clean the dashboard surface thoroughly to remove dust, oils, or residue so the adhesive can make direct contact. Stop if residue remains.
- Dry the area completely before installation to avoid moisture interfering with adhesion. Pause if any dampness is present.
- Align the adhesive base carefully with the intended position, ensuring correct orientation for reach and visibility. Stop if alignment feels uneven.
- Apply first contact by placing the adhesive pad onto the dashboard without sliding, maintaining accurate positioning. Pause if repositioning is needed.
- Press evenly across the mount base to distribute pressure and improve full surface contact. Stop if pressure cannot be applied consistently.
- Allow the adhesive to settle before attaching the phone, avoiding early load that could affect bond formation. Pause if the mount shifts during settling.
After installation, avoid immediate full loading of the phone, since early stress may reduce bond stability depending on surface conditions, pressure consistency, and adhesive characteristics.
This chart shows the main installation steps for a dashboard adhesive phone mount, including key checks and warnings at each stage.
Clean and Dry the Mounting Area
Clean and dry the mounting area refers to preparing the dashboard contact point so the adhesive can form stable initial bonding without interference from surface contamination or moisture.
Dust, oils, dressing residue, cleaner residue, lint, and moisture can all interfere with adhesive contact by reducing surface grip or preventing uniform bonding across the pad. Each contamination type affects adhesion differently, so the mounting area should be checked and cleared before positioning the adhesive base.
- Dust — can block direct contact between adhesive and dashboard surface, reducing bond strength
- Oils — create a slippery layer that weakens initial grip and may lead to gradual edge separation
- Dressing residue — leaves a coating that prevents consistent adhesion across the mounting area
- Cleaner residue — may interfere with bonding if not fully removed and dried before installation
- Lint — introduces uneven micro-points that reduce full surface contact
- Moisture — disrupts adhesion and prevents proper initial bonding until fully dried
Align the Base Before Final Contact
Align the base before final contact refers to positioning the adhesive mount correctly on the dashboard so the base orientation, viewing angle, reach, and contact area are confirmed before the adhesive touches the surface.
This alignment stage prevents misplacement during final contact, since once the adhesive makes contact, repositioning may reduce bonding strength depending on adhesive type and surface conditions. Careful pre-contact checking helps ensure the mount base sits correctly before pressure is applied.
Pre-contact alignment checklist for Align the Base Before Final Contact:
- Viewing angle — confirms the screen remains readable without requiring head movement away from the road
- Reach — ensures the mount can be accessed comfortably without overextension
- Base orientation — verifies the mount sits level and matches intended directional positioning
- Cable clearance — ensures charging or cable routing will not be blocked or strained
- Contact-area confirmation — checks that the selected dashboard point supports full adhesive contact
Caution: Some adhesive pads may lose bonding strength if lifted and reapplied, so alignment should be completed before first contact whenever possible.
Press the Adhesive Base Evenly
Press the adhesive base evenly refers to applying controlled, uniform pressure across the mounting base so the adhesive layer bonds consistently with the dashboard surface before it sets.
Even pressure supports the adhesive base by improving full surface contact and reducing uneven bonding zones that can lead to edge lift or base rocking. Pressure should be distributed rather than concentrated, since bonding behavior can vary depending on adhesive type and dashboard material.
Pressure application checklist for Press the Adhesive Base Evenly:
- Center-to-edge pressure — apply pressure from the center outward to distribute adhesion evenly
- Edge contact — ensure all outer edges are pressed down to avoid partial lift zones
- Base rocking — avoid movement during pressing to maintain stable contact alignment
- Hold consistency — keep steady pressure without shifting the mount position
- Immediate stress avoidance — avoid applying load before the bond begins to stabilize
Note: Hold duration and pressure strength can be product-dependent and should follow the mount manufacturer’s instructions where provided.
Let the Adhesive Cure Before Loading the Phone
Let the adhesive cure before loading the phone means allowing the adhesive base to stabilise on the dashboard before it carries any weight from the phone holder. This waiting period supports bond development between the adhesive layer and the surface.
Immediate loading can reduce bond stability because the adhesive cure process may still be ongoing after initial placement. Temperature conditions, phone weight, mount arm leverage, and early loading all influence how the bond settles, and uneven stress during this stage can affect long-term adhesion performance.
Caution: The adhesive base should not be stressed too early, as premature loading may weaken initial bond formation depending on product type and installation conditions.
- Curing time — varies by adhesive type and should follow manufacturer guidance where available
- Temperature — warmer or cooler conditions can influence how quickly the bond stabilises
- Phone weight — heavier devices place more load on an uncured adhesive base
- Mount arm leverage — longer arms increase torque on the adhesive during early use
- Early loading — applying weight too soon can interfere with bond formation
Installation Mistakes That Reduce Adhesive Strength
Installation mistakes that reduce adhesive strength refer to small but critical setup errors that weaken the bond between the adhesive base and the dashboard surface, even when the mount appears correctly installed.
These errors affect adhesive performance by disrupting surface contact, bond formation timing, or load distribution. As a result, the adhesive base may lose stability over time depending on dashboard condition, mounting angle, and applied stress.
The following mistake-and-effect patterns show how installation choices directly influence adhesive strength:
| Mistake | Why it weakens adhesion | What to do before continuing |
|---|---|---|
| Dirty surface | Prevents full adhesive contact with the dashboard, reducing bond consistency | Clean and fully dry the mounting area before reinstallation |
| Curved contact | Creates uneven pressure distribution across the adhesive base | Select a flatter mounting position where possible |
| Premature loading | Interrupts early bond formation before stability develops | Allow adhesive cure time before attaching the phone |
| Repeated repositioning | Weakens adhesive layer grip through repeated lift-and-replace cycles | Align carefully before first contact and limit adjustments |
| Dashboard protectants | Leaves residue that blocks direct adhesive bonding | Remove any surface coating before installation |
| High-stress angle | Increases leverage force on the adhesive base during use | Adjust orientation to reduce torque load |
| Heat exposure | Can soften adhesive behavior depending on temperature conditions | Avoid prolonged high-temperature dashboard zones |
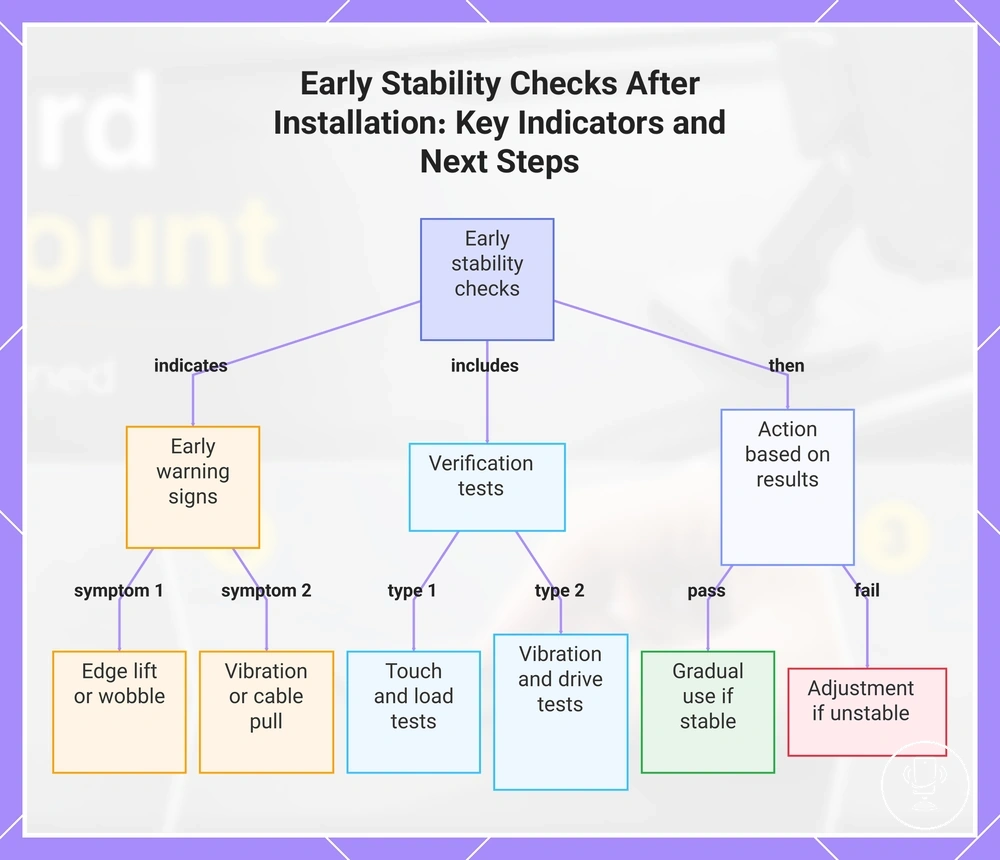
Early Stability Checks After Installation
Early stability checks after installation refer to the initial verification process used to confirm whether the phone mount remains firmly attached to the dashboard before it is used in normal driving conditions.
These checks focus on observable movement and early load behavior to ensure the adhesive base has settled properly. Edge separation, shifting under light touch, and instability under initial vibration are key indicators that the mount may require adjustment before continued use.
- Base edge lift — verifies whether any part of the adhesive is separating from the dashboard surface
- Wobble — checks for unwanted movement when the mount or phone is lightly touched
- Phone weight response — confirms whether the mount stays stable under initial device load
- Arm angle stability — ensures the holder does not slowly tilt or sag after positioning
- Vibration reaction — detects excessive movement during light vibration or idle conditions
- Cable pull — checks whether charging cable tension shifts the mount position
- Initial drive conditions — observes stability during short, low-speed movement tests
Edge lift or wobble during these checks often indicates incomplete settling or uneven surface contact, while vibration sensitivity or cable pull movement may signal that load distribution needs correction. These signals should be treated as early indicators rather than final performance results under long-term use.
If the setup passes these checks without visible instability, it can be used gradually while continuing to observe performance changes during early drives. For additional mounting guidance and related accessories, refer to the car phone mount hub
Here are product examples that may make comparison easier. Before buying, always review the compatibility criteria, essential features, and product details.


This chart shows the main indicators and checks used to verify phone mount stability after installation, along with the recommended actions based on results.
When the Dashboard Adhesive Does Not Stick
When a dashboard adhesive mount does not stick, the cause usually relates to surface contamination, insufficient contact area, weak or aged adhesive, early loading, or an unsuitable dashboard texture that prevents proper bonding.
These conditions interrupt the adhesive’s ability to form a stable surface bond. In most cases, the issue is not a single factor but a combination of surface condition and installation timing that reduces initial grip and prevents proper settling.
| Symptom | Likely cause | Check | Safe next action | Stop-point |
|---|---|---|---|---|
| Mount lifts shortly after placement | Surface contamination or dashboard protectant residue | Inspect surface feel and residue presence | Pause use and reassess surface cleanliness | If residue persists after cleaning |
| Weak initial hold | Insufficient contact area or curved dashboard surface | Check base contact alignment | Reposition to flatter area if available | If no flat area is available |
| Slippage under load | Early loading or weak adhesive condition | Review timing of phone attachment | Allow settling time before reloading | If repeated slipping occurs |
| Gradual detachment | Heat exposure combined with load history | Observe dashboard temperature conditions | Reduce high-temperature exposure zones | If adhesive softening continues |
The diagnostic table separates surface, contact, and timing issues so each failure mode can be traced to a specific condition rather than assumed as a full installation failure. Persistent issues often involve more than one contributing factor acting together.
When evaluating edge cases, conditions such as adhesive age, dashboard texture, and temperature exposure should be considered together, especially in relation to heat and adhesion durability.
Here are product examples that may make comparison easier. Before buying, always review the compatibility criteria, essential features, and product details.
Surface Contamination or Dashboard Texture Problems
Surface contamination or dashboard texture problems occur when the adhesive fails to form a stable bond because the dashboard surface interrupts direct contact, usually due to residue layers, uneven texture, or micro-gaps that reduce grip strength.
These issues typically present as weak initial sticking, partial lifting, or inconsistent hold, especially when the surface condition prevents the adhesive from spreading evenly across the full contact patch.
- Residue layers — reduce direct contact and lead to weak or short-lived adhesion
- Protectant buildup — creates a slippery film that causes early edge lift
- Deep dashboard texture — prevents full surface contact and results in uneven grip
- Curved surface geometry — reduces contact patch stability and increases wobble
- Moisture presence — disrupts bonding and causes delayed or failed adhesion
- Weak contact patch — leads to partial sticking followed by gradual detachment
Weak Adhesive Pad or Early Weight Load
Weak Adhesive Pad or Early Weight Load occurs when the dashboard mount fails because the adhesive pad cannot maintain bonding strength or because the phone is applied too early or with excessive load before the adhesive has stabilised.
These failures are typically split into two groups: pad-related weakness, where the adhesive material has reduced holding capacity, and load-related stress, where timing or weight conditions exceed what the bond can support during early adhesion formation.
Separation of these two causes helps identify whether the issue comes from adhesive condition or from usage pressure during installation and early handling.
- Old adhesive — reduced bonding strength can lead to early detachment under normal use
- Reused pad — previously lifted adhesive may not re-establish full surface grip
- Weak gel layer — inconsistent bonding material can reduce stable contact formation
- Heavy phone load — excessive device weight can overstress the adhesive base
- Long mount arm leverage — increased torque can weaken hold even on correct placement
- Phone loading before cure — early weight application can interrupt bonding formation and reduce grip