Car Phone Mount Rotation and Viewing Angle Control
Car phone mount rotation and viewing angle control are usage attributes that set how the phone is oriented toward the driver, not separate mount types. Rotation changes the phone orientation, while viewing angle shapes screen readability from the driver position. Angle control depends on mount design and cabin conditions.
During everyday driving, a small change in tilt, swivel, or mount head position can affect how easily the screen can be seen and reached. The same adjustment may also change grip pressure or joint resistance. A useful setup connects visibility, reach, grip, and comfort without assuming one fixed angle works in every car cabin.
This page focuses on adjustable viewing angle control, not full windshield positioning or phone-size compatibility. It explains how rotation, cabin layout, and stability conditions work together before moving into the first grounding section on how car phone mount adjustment works.
How car phone mount adjustment works
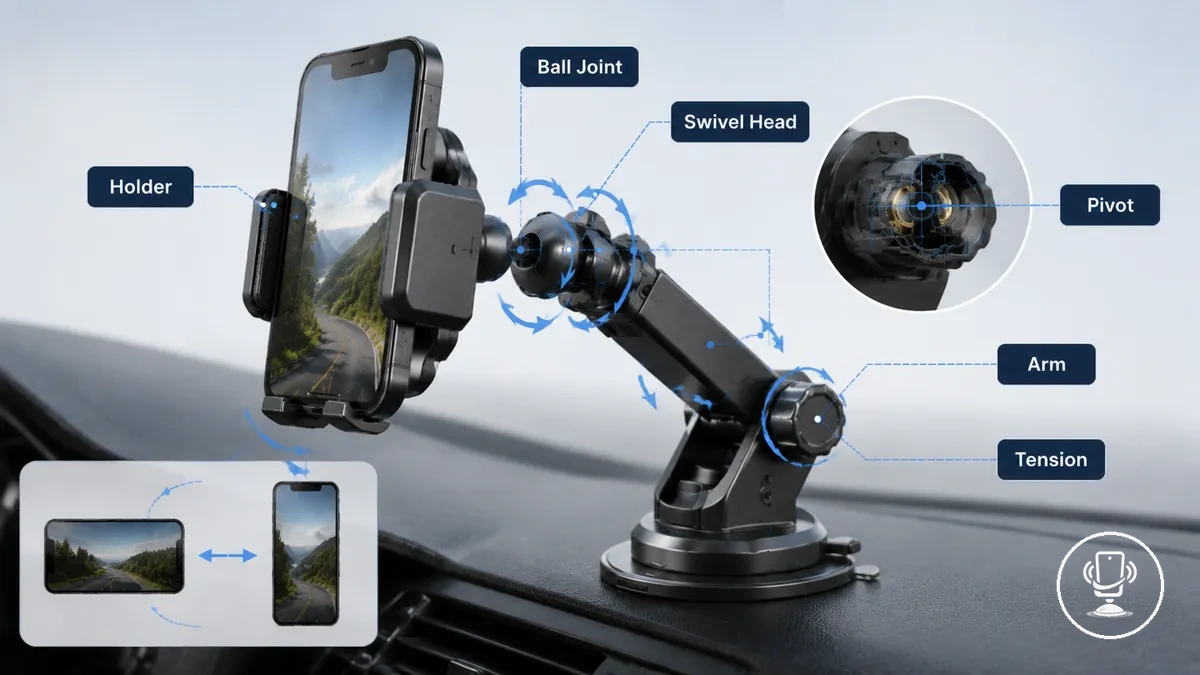
Car phone mount adjustment is the controlled change of phone orientation, reach, and viewing angle within the mount's mechanical limits. It changes the position of the phone without changing the mounting location itself. The main parts that can change position are the mount body, holder, joint, arm, tension point, and mounting base.
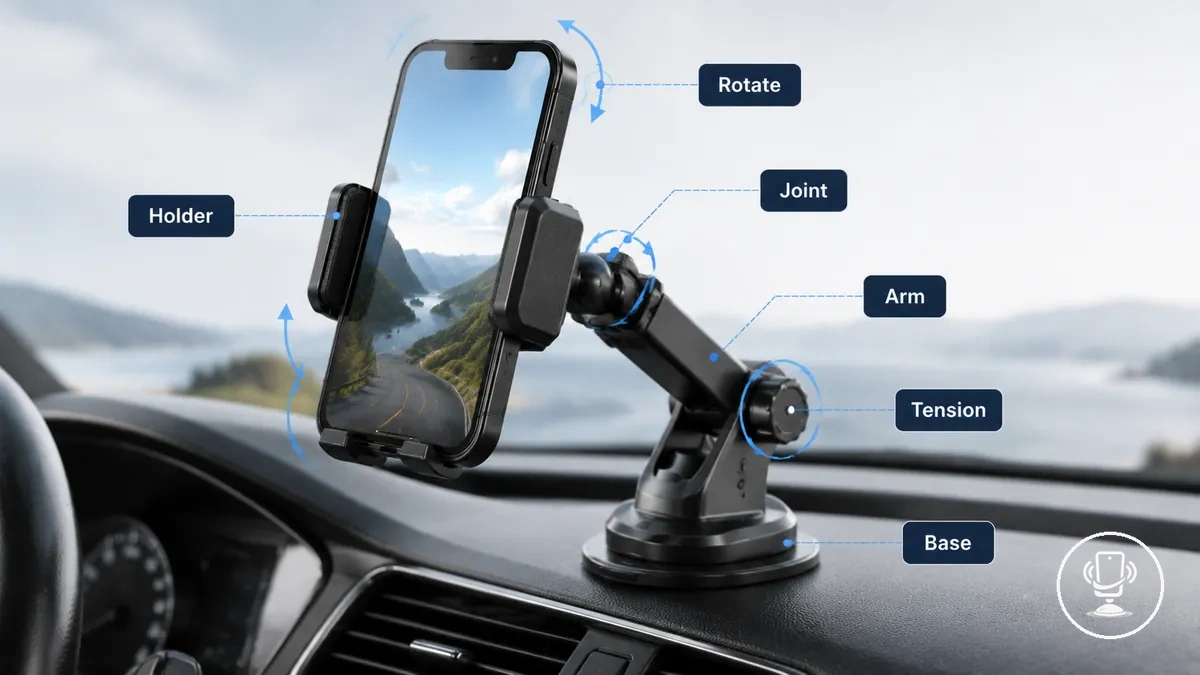
How car phone mount adjustment works is easier to understand by looking at the parts that control movement. The checklist below organizes the components and conditions that change phone orientation, reach, and viewing angle. Adjustment range depends on the mount's mechanical design and the resistance built into its moving parts.
- Mount body: supports controlled movement between connected parts.
- Holder: rotates to change phone orientation, such as switching from portrait to landscape.
- Joint: changes tilt and viewing angle, with movement limited by its mechanical range.
- Arm: extends or repositions the holder to change reach, depending on the arm design.
- Tension point: provides resistance that can help maintain grip and stability after repositioning.
- Mounting base: keeps the mount anchored while the upper parts are adjusted.
For example, a driver may rotate the holder from portrait to landscape to better suit the displayed content while leaving the mounting base in the same position. Changes to the joint, arm, or tension point can also influence reach, grip, and viewing angle, although the available movement depends on the mount's design and mechanical resistance. For a broader overview of related mounting topics, visit the car phone mount hub.
Rotation mechanisms that control phone orientation
Rotation mechanisms are the moving parts that control phone orientation by balancing movement range with resistance. They allow a car phone mount to rotate, tilt, or reposition while helping the holder remain in the selected position. Together, ball joints, swivel heads, pivots, adjustable arms, tension collars, and holder clamps function as movement-and-resistance systems rather than separate product options.
Rotation mechanisms that control phone orientation are easiest to compare by looking at movement range, resistance, and locking behavior together. The table below organizes the main mechanisms by the conditions that influence orientation and grip. Smoother movement can make repositioning easier, while firmer resistance may help reduce unwanted movement, depending on the mechanism design and adjustment.
| Mechanism | Movement or resistance | Condition to check | Effect on orientation or grip |
|---|---|---|---|
| Ball joint | Wide movement range | Joint resistance | Flexible angle control that may depend on tension for grip |
| Swivel head | Rotating movement | Locking behavior | Changes between portrait and landscape orientation |
| Pivot | Single-axis movement | Pivot resistance | Controls tilt through a defined movement path |
| Adjustable arm | Extended or repositioned reach | Arm rigidity | Changes viewing position while movement depends on design |
| Tension collar | Adjustable resistance | Tightness setting | May help reduce drift after adjustment |
| Holder clamp | Grip on the phone | Phone size and case thickness | Grip can vary with the fitted device |
For example, a swivel head can rotate the phone between portrait and landscape, while a ball joint or pivot changes the viewing angle through a different movement path. The balance between smooth movement and firm resistance depends on the mechanism because greater freedom of movement may require more resistance to help maintain the chosen position. If phone size or case thickness affects holder grip, see the compatibility guide.
Ball joints, pivots, and swivel heads
Ball joints, pivots, and swivel heads are joint types that control how a car phone mount changes angle through different movement axes. A ball joint supports multi-direction movement, a pivot follows a fixed movement axis, and a swivel head rotates the holder between portrait and landscape. These joint types control local movement and angle control without representing the entire mount system.
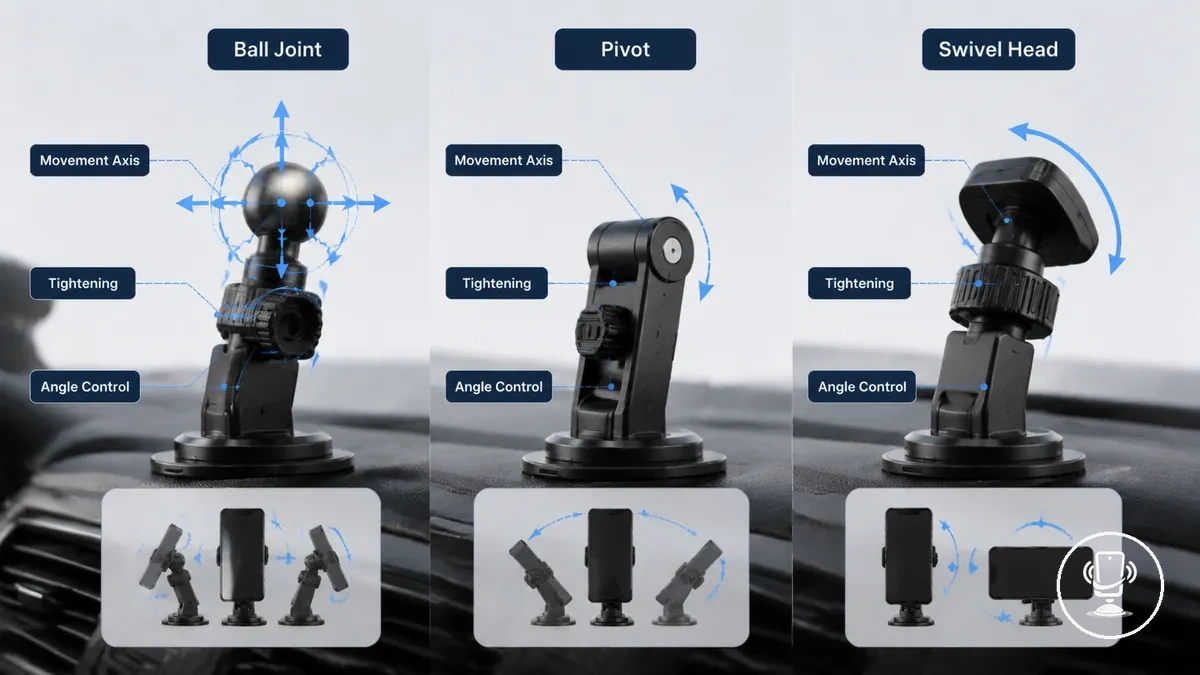
When a phone gradually changes angle during driving, the cause may be reduced resistance in a specific joint rather than the whole mount. For example, a ball joint may allow angle drift if its tightening method no longer provides enough resistance for the phone weight, while a pivot or swivel head can respond differently because each uses a different movement axis. The tightening method influences how well each joint maintains angle control after adjustment.
| Joint type | Movement type | Tightening behavior | Angle-control implication |
|---|---|---|---|
| Ball joint | Multi-direction movement | Tightening adjusts resistance | Flexible angle control that may drift if resistance decreases |
| Pivot | Fixed movement axis | Resistance applied around the pivot point | Provides controlled tilt through a defined axis |
| Swivel head | Portrait and landscape rotation | Locking or tightening point controls movement | Supports orientation changes while resistance depends on joint condition |
Adjustable arms and extension range
An adjustable arm changes how far a phone can be positioned from its mounting point, while extension range determines how much that distance can be increased or reduced. Arm length, telescoping behavior, and locking resistance work together to influence reach and usable viewing position. Extension changes reach and leverage at the same time.
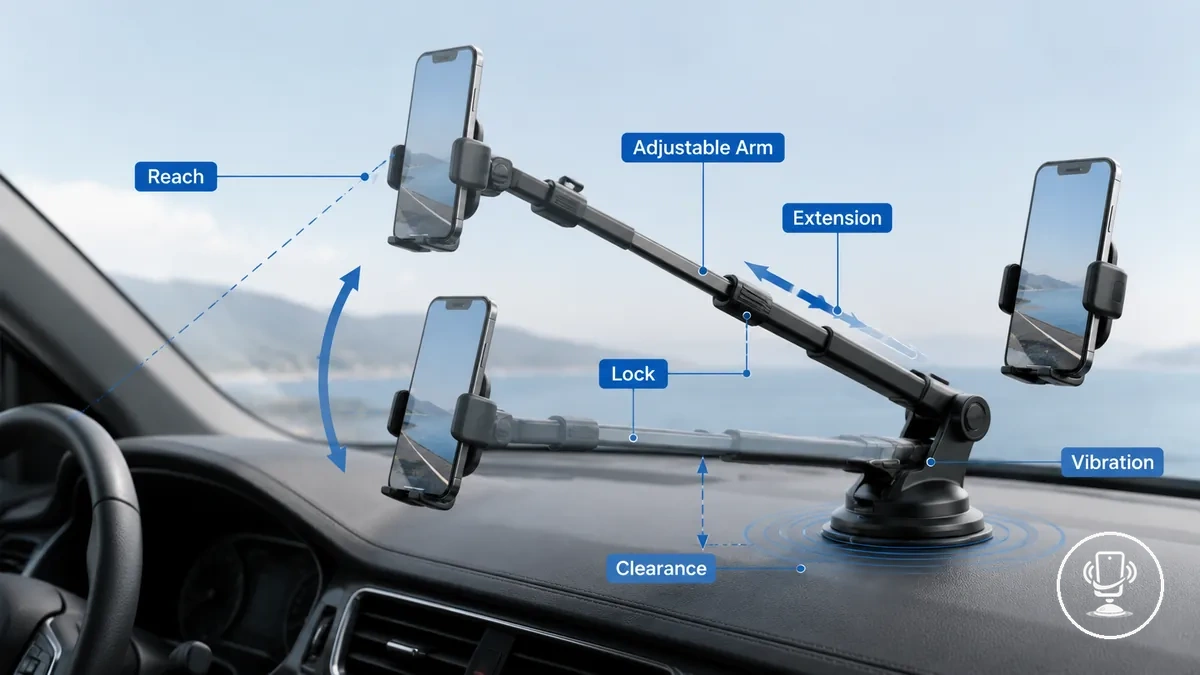
When a driver needs the screen closer or higher, extending the adjustable arm can improve the viewing position without moving the mounting base. Adjustable arms and extension range affect both visibility and leverage, so the attributes below summarize how extension changes positioning. A longer arm may also increase vibration or movement because greater leverage depends on arm length, locking resistance, mount design, and road conditions.
- Reach: Extension range moves the phone closer to or farther from the driver.
- Height: Arm length and telescoping behavior can change the usable viewing position.
- Locking resistance: The selected arm position may be maintained more effectively when the locking mechanism provides adequate resistance.
- Vibration: Longer reach may increase movement because additional leverage can amplify vibration under some driving conditions.
- Dashboard clearance: Arm position can affect the space between the phone, dashboard, and nearby controls.
When a windshield-mounted setup uses a longer extension arm, improved reach may also increase movement if the available locking resistance is reduced by added leverage. For more detail on placement rather than arm behavior, see windshield positioning.
Portrait, landscape, tilt, and height movement
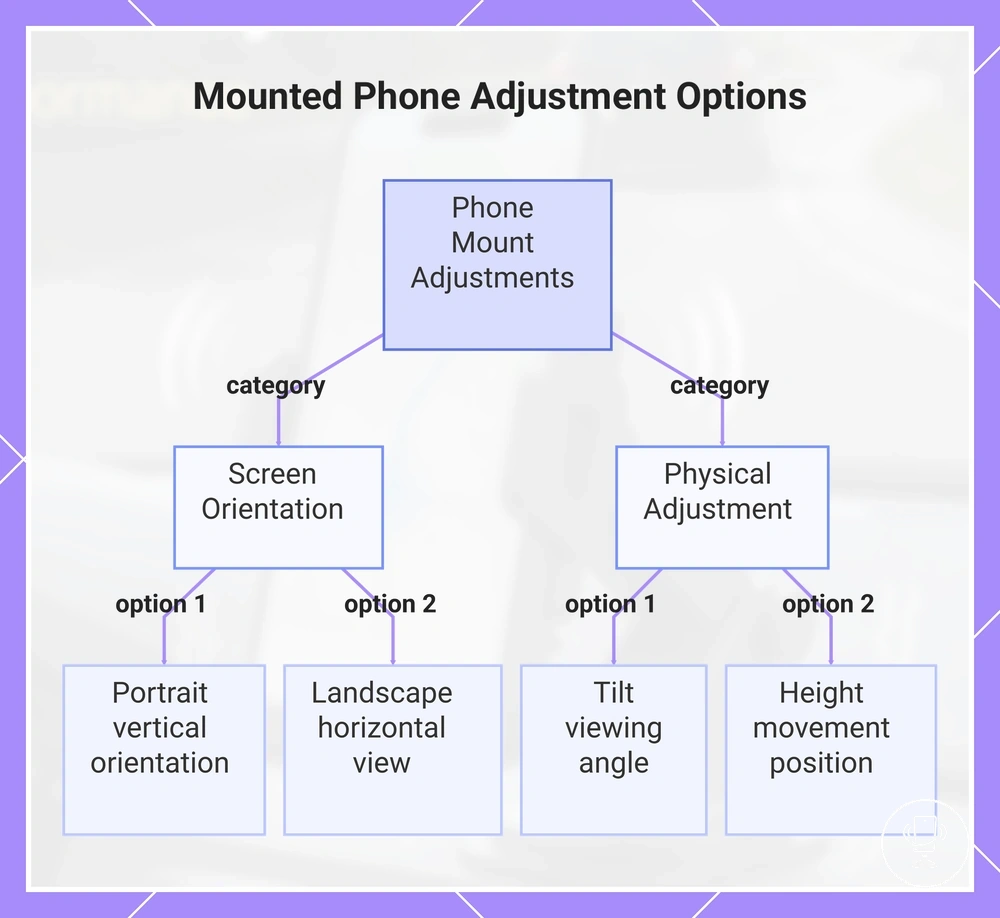
Portrait, landscape, tilt, and height movement are adjustment options that change how a mounted phone is viewed. Portrait and landscape define the screen orientation, while tilt and height movement adjust the viewing angle and screen position. Screen orientation determines how content is displayed, whereas viewing angle affects how that content is seen.
When using navigation, landscape mode may display more horizontal map content, while portrait mode can suit quick-glance information depending on the application and screen layout. Tilt and height movement can then be adjusted for the driver's position, where readability, glare, and reach depend on viewing angle, light conditions, dashboard height, and screen brightness rather than orientation mode alone.
- Portrait: Vertical orientation that changes how content is displayed.
- Landscape: Horizontal orientation that may provide a wider view for certain applications.
- Tilt: Changes the viewing angle, which can influence readability and glare.
- Height movement: Raises or lowers the phone position, affecting line of sight and reach.
This chart shows the two main categories of phone mount adjustments: screen orientation and physical position changes, along with their specific options.
Viewing angle factors inside the car cabin
A usable viewing angle depends on conditions inside the car cabin rather than a fixed universal angle. Dashboard height, vent position, windshield distance, steering wheel clearance, seat position, driver reach, screen brightness, and glare all influence how comfortably the screen can be viewed. The most suitable adjustment varies with cabin layout, mount design, and driver position instead of one fixed setting.
When the same phone mount is used in different vehicles, cabin layout can change how the screen is viewed and reached. The criteria below summarize the main conditions that influence viewing angle decisions and how each factor can affect readability and comfort.
| Cabin factor | What to check | Adjustment implication | Qualification |
|---|---|---|---|
| Dashboard height | Screen position relative to the driver's line of sight | May require tilt or height adjustment | Depends on cabin layout and seat position |
| Vent position | Location of the air vent and nearby controls | Can influence viewing angle and driver reach | Varies with dashboard design |
| Windshield distance | Distance between the phone and the windshield | May change screen reflections and viewing comfort | Depends on mount position and vehicle layout |
| Steering wheel clearance | Available space around the steering wheel | Can affect usable phone position | Varies with steering wheel adjustment |
| Seat position | Driver seating height and distance | Changes viewing angle and reach | Depends on individual driving position |
| Driver reach | Comfortable access to the screen | May influence phone position | Varies by driver posture |
| Screen brightness | Screen visibility under current lighting | Can improve readability when adjusted | Depends on ambient light |
| Glare | Reflections from sunlight or interior lighting | May require tilt adjustment | Depends on light direction and screen angle |
If glare reduces readability or steering wheel clearance limits adjustment, changing the phone angle or position may improve comfort without relying on a universal viewing angle. A dashboard, vent, or windshield-adjacent setup may each require different adjustments because cabin conditions change the relationship between reach, screen brightness, and reflections. For windshield-adjacent setups, see windshield positioning for additional placement context.
Driver reach and screen readability
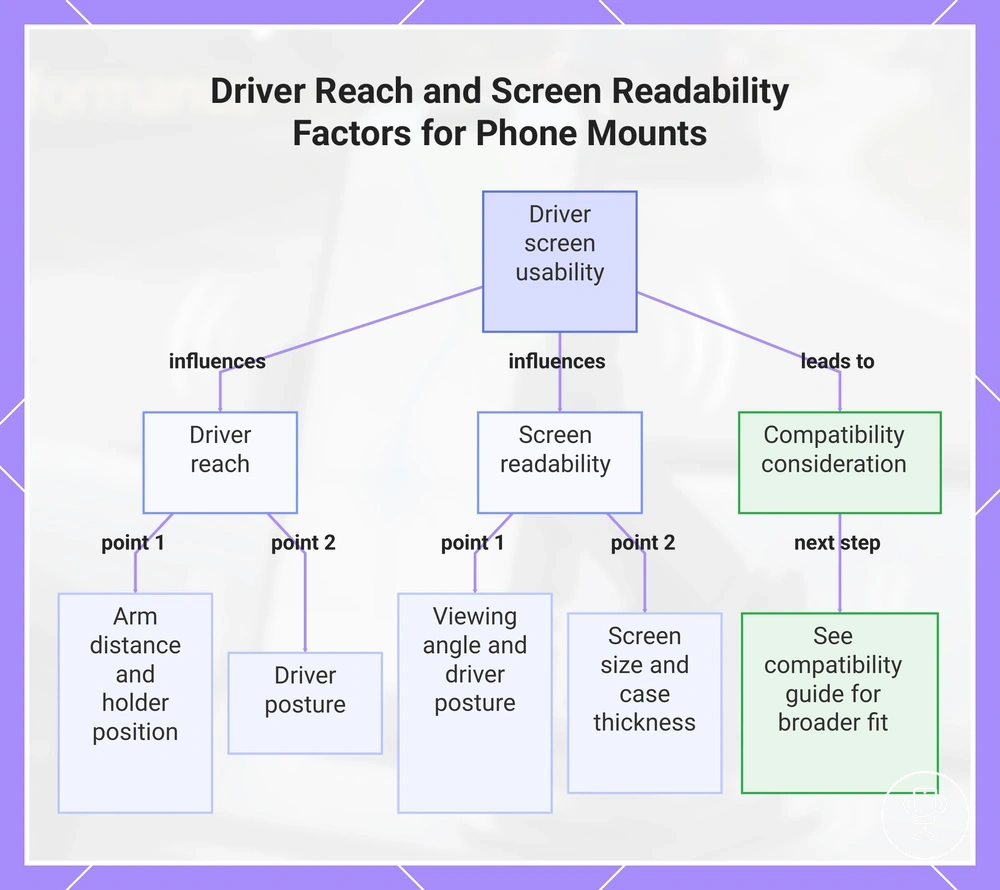
Driver reach and screen readability determine how much of the available viewing angle remains practical during normal use. Arm distance, holder position, and driver posture influence whether the screen can be viewed comfortably without awkward movement. Reach and readability work together when adjusting phone position.
When a phone is mounted closer to the dashboard, it may be easier to glance at while remaining within comfortable arm distance. A farther windshield-mounted setup may require a different viewing angle because driver posture, holder position, and readable distance change with cabin layout. Screen readability can also vary with screen size, case thickness, and holder position, depending on how the phone is supported and viewed.
- Driver reach: Arm distance and holder position influence how comfortably the screen can be accessed.
- Screen readability: Viewing angle and driver posture affect how easily information can be seen.
- Screen size: Larger or smaller displays may change readable use depending on viewing distance.
- Case thickness: Thicker cases can affect holder fit and phone position.
If screen size or case thickness becomes an important criterion when adjusting holder position, see the compatibility guide for broader fit considerations.
This chart shows the key factors that influence driver reach and screen readability when using a phone mount in a car.
Glare, dashboard height, and seat position
When low sun enters the car cabin or an angled dashboard reflects light toward the screen, the practical viewing angle may change even if the mount remains in the same position. Glare, dashboard height, and seat position can influence screen visibility because light direction and screen reflection vary with cabin conditions. Glare and seat position can therefore change the practical viewing angle.
If screen visibility becomes harder to maintain, observe the cabin conditions before changing phone tilt. The checklist below helps identify whether lighting or positioning is affecting the display.
- Light direction: Check whether sunlight or cabin light creates screen reflection.
- Screen reflection: Observe whether a small phone tilt adjustment reduces visible reflection.
- Dashboard slope: An angled dashboard may change how light reaches the screen.
- Seat height: A different seat position can alter the viewing relationship between the driver and the phone.
- Phone tilt: Small adjustments may improve screen visibility depending on dashboard height and current lighting.
Adjusting phone tilt may improve screen visibility when glare or screen reflection becomes noticeable, but the result depends on light direction, dashboard height, dashboard slope, and seat position rather than a single universal adjustment.
Line of sight and safe viewing limits
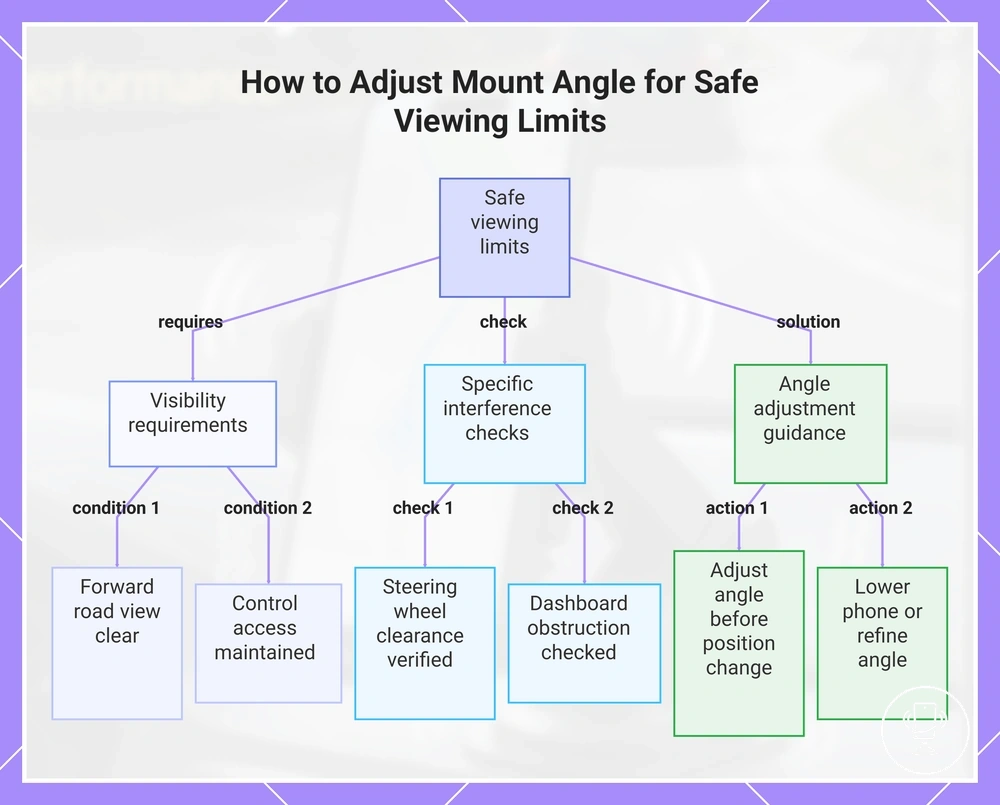
Adjust the mount angle so it supports quick glances without blocking the road, controls, or important cabin visibility. Safe viewing limits depend on maintaining a clear line of sight while keeping the screen readable, although the practical angle may vary with vehicle layout and driver position.
If the screen begins to distract from the road view, adjust the mount angle before changing the mounting position. Check how phone height, screen readability, steering wheel clearance, and dashboard obstruction affect the display so the screen remains easy to glance at without reducing road visibility. A clear line of sight depends on preserving both the road view and access to vehicle controls.
- Road view: Confirm the phone does not block the forward view.
- Control access: Make sure important controls remain easy to reach and see.
- Quick glances: Position the screen where information can be checked briefly without unnecessary distraction.
- Steering wheel clearance: Verify the steering wheel does not obstruct the display.
- Dashboard obstruction: Check that the mount does not interfere with dashboard visibility.
- Mount height: Use a height that supports screen readability while preserving cabin visibility.
When a higher mount height begins to reduce the road view, lowering the phone or refining the angle adjustment may improve visibility while keeping the mount in the same location. This section focuses on angle adjustment and safe viewing limits rather than broader safety-positioning guidance because suitable placement depends on the vehicle layout and driver position.
This chart shows the key visibility checks and adjustment actions needed to maintain safe viewing limits when positioning a phone mount.
Adjusting the mount without weakening grip
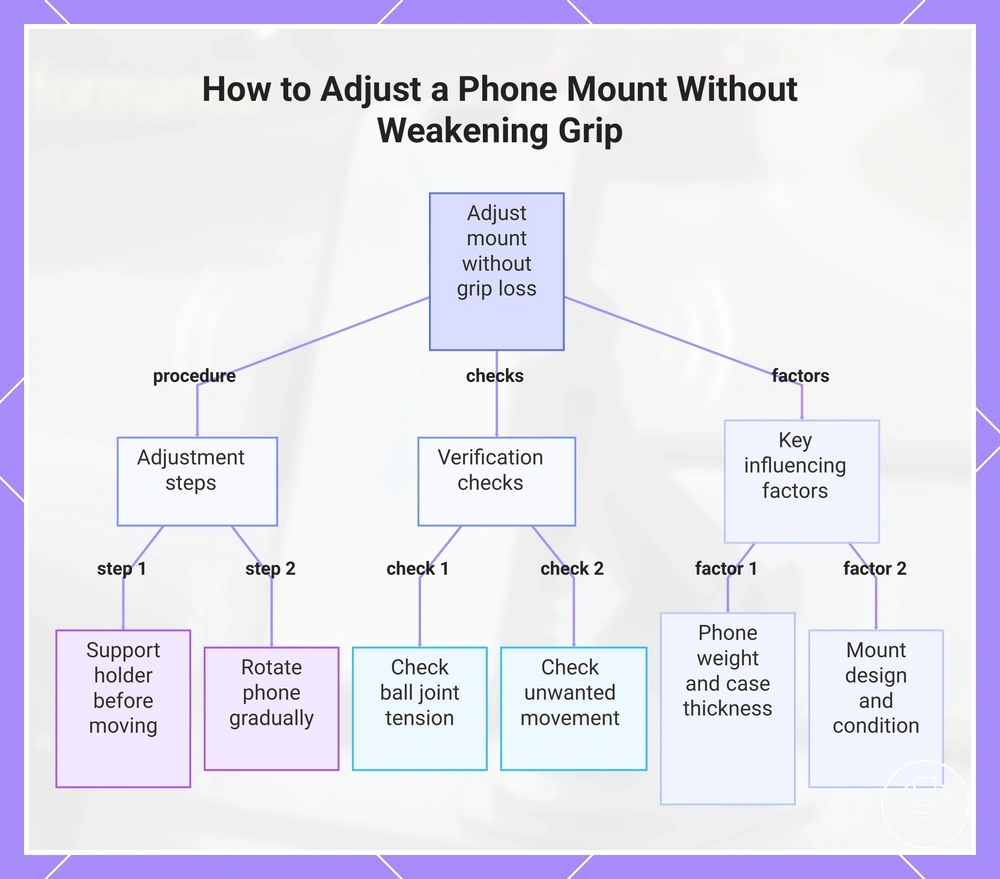
Adjust the mount by supporting the holder, moving the joint gradually, and checking tension before driving. This approach can help preserve holder grip and mount resistance because controlled movement reduces unnecessary pressure on the moving parts, although grip can still vary with the mount design and condition.
If the holder feels loose after an adjustment, review how pressure was applied before tightening the locking knob. Applying force in the wrong direction may reduce ball joint tension, affect holder grip, or place extra stress on the mounting base. Phone weight and case thickness can also influence grip balance, so pressure direction matters during adjustment.
- Support the holder before moving the joint.
- Loosen the locking knob only if the mount design requires it.
- Rotate the phone gradually while avoiding pressure against the mounting base.
- Retighten the locking knob, if applicable, and check that ball joint tension provides consistent mount resistance.
- Check for unwanted movement before driving while confirming holder grip remains appropriate for the phone weight and case thickness.
When rotating the phone from portrait to landscape, turn the holder instead of pulling against the mounting base. This keeps the adjustment focused on the moving joint and may reduce unnecessary stress on the holder, although the final grip depends on the mount design, phone weight, case thickness, and mounting base condition.
This chart shows the key steps and checks to adjust a phone mount while preserving holder grip and mount resistance.
Tension, locking, and resistance checks
Tension, locking, and resistance checks help confirm whether a phone mount has enough resistance after adjustment. The tightening point, locking ring, joint friction, holder clamp pressure, and light hand pressure are useful confirmation signals.
If angle drift appears after repositioning, inspect the joint before assuming phone weight is the cause. For example, a phone that slowly changes angle under light hand pressure may indicate a loose joint rather than phone weight alone. These checks can help identify movement signals, but tension may not solve every stability issue.
- Tightening point: Check that the tightening point is engaged without forcing it further.
- Locking ring: Confirm the locking ring remains secure after adjustment.
- Joint friction: Apply light hand pressure to see whether the joint holds position or shows angle drift.
- Holder clamp pressure: Verify the phone is held without obvious slippage.
- Light movement test: Gently move the holder by hand to check for unwanted movement without pulling on the mounting base.
Rotation pressure and phone grip balance
Apply rotation pressure through the holder head while supporting the phone with your hand during orientation changes. This helps keep phone grip balance focused on the moving joint rather than transferring force to the mounting base, so pressure should act through the holder head instead of the base.
When changing from portrait to landscape, rotate through the holder head instead of pulling against the mounting base. This contrast helps separate safe rotation direction from pressure that may contribute to unwanted movement, although grip security depends on clamp contact, phone weight, case surface, and mount resistance.
- Preferred pressure direction: Use hand support and apply rotation pressure through the holder head.
- Avoid: Pulling against the mounting base, as this may increase unnecessary stress on the mount.
- Clamp contact: Check that the holder maintains even contact with the phone throughout the orientation change.
- Grip conditions: Phone grip balance can vary with phone weight and case surface.
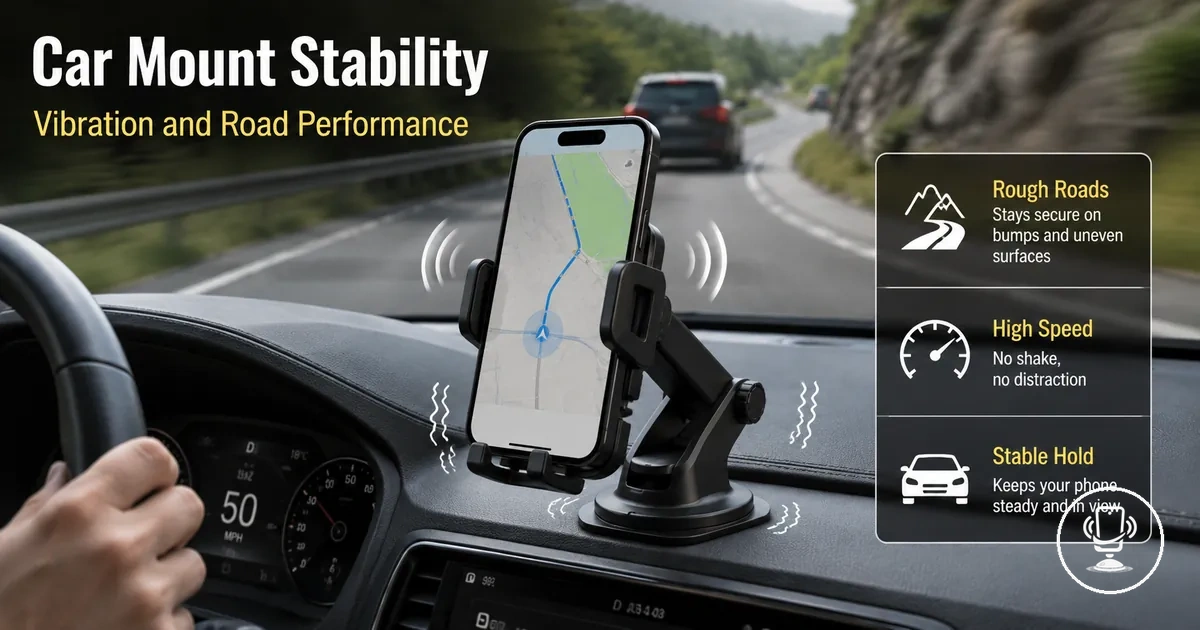
When angle changes affect mount stability
Instability is more likely when phone weight shifts farther from the base, the joint is loose, or the mounting surface is already weak. Normal adjustment movement differs from a stability problem because mount stability depends on leverage, joint resistance, and base support.
If the phone begins to shake, sag, slip, or show angle drift after repositioning, compare the angle position with the mount condition before assuming one cause. Angle position, extension length, phone weight, joint resistance, road vibration, and base adhesion or suction can interact to affect how the mount responds. A longer reach can increase leverage, so reduced joint resistance may become more noticeable after larger angle changes.
| Symptom | Likely attribute issue | Check | What it means |
|---|---|---|---|
| Shake | Road vibration or reduced joint resistance | Observe movement on typical road surfaces | Movement may increase when vibration combines with reduced resistance. |
| Sagging | Phone weight and extension length | Compare the current angle with a shorter reach | Greater leverage may increase downward movement. |
| Slipping | Reduced base adhesion or suction | Inspect the mounting surface and base contact | Base support may no longer provide consistent hold. |
| Angle drift | Loose joint | Check whether the joint gradually changes position after adjustment | Angle drift may indicate reduced joint resistance rather than phone weight alone. |
When a heavy phone is used with a long extension arm on rough roads, angle changes may make instability easier to notice. The outcome depends on mount design, phone weight, road vibration, and the condition of the joint and mounting surface rather than the angle change alone.
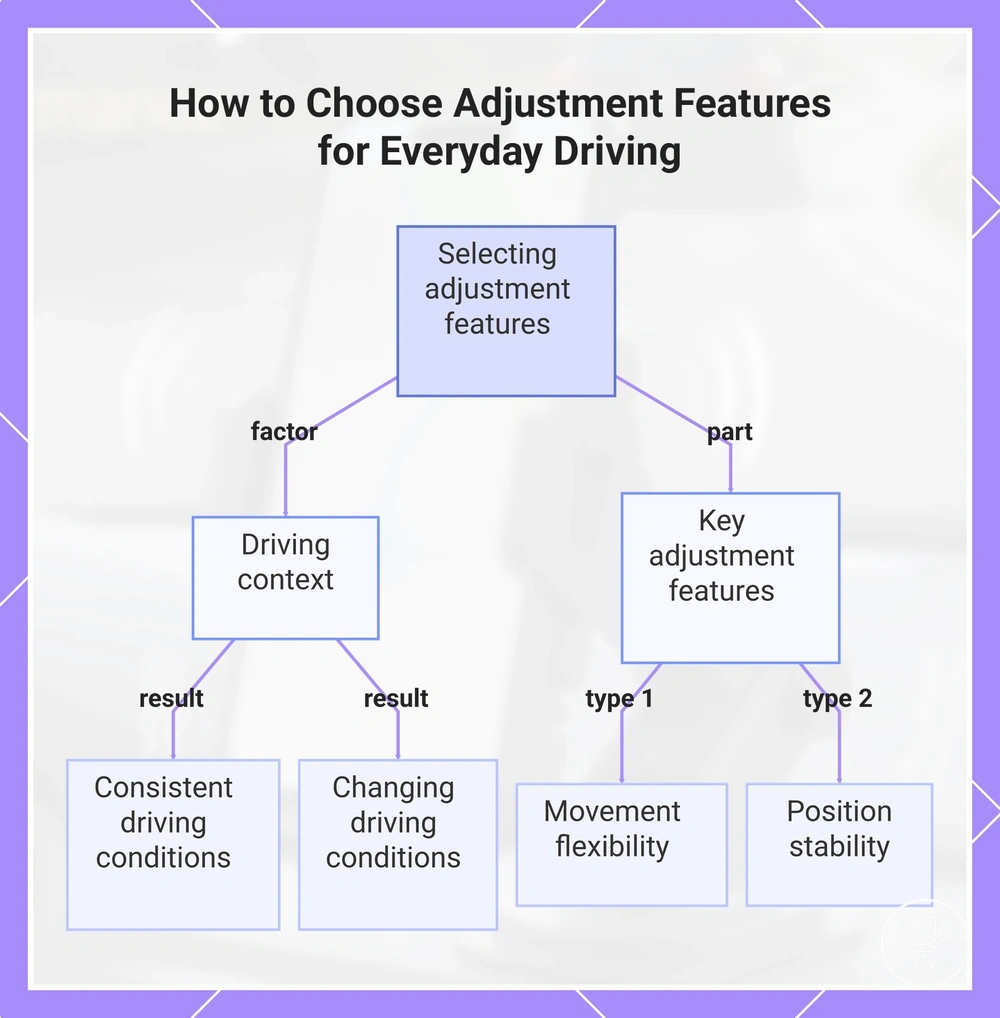
Choosing adjustment features for everyday driving
Choose adjustment features by matching them to everyday driving needs instead of assuming every adjustment option is necessary. Rotation range, joint resistance, arm extension, locking control, grip strength, screen orientation, and cabin placement should be evaluated together because they influence comfort, readability, and stability differently. The right feature combination depends on driving context and phone fit.
When daily driving follows a consistent route and seating position, a simpler fixed-angle mount may be enough. Wider rotation range and arm extension can become more useful when screen orientation, driver position, or cabin placement changes regularly. This distinction helps separate simple fixed-angle needs from situations where broader adjustment is beneficial.
If the current setup is difficult to position comfortably, compare adjustment features with your normal driving conditions before choosing additional movement. Joint resistance, locking control, grip strength, phone fit, and case thickness should be considered together because each can influence how well the selected position is maintained. Use the checklist below to compare the most relevant decision criteria.
- Rotation range: Consider wider movement if screen orientation changes frequently.
- Joint resistance: Check whether the joint can maintain the selected angle during normal use.
- Arm extension: Choose adjustable reach when cabin placement or driving position varies.
- Locking control: Match the locking method to the amount of adjustment required.
- Grip strength: Evaluate phone fit, including case thickness, when assessing holder grip.
- Screen orientation: Select adjustment based on how often portrait and landscape modes are used.
- Cabin placement: Consider how the mounting location affects comfort, readability, and reach.
Use these criteria together rather than relying on a single adjustment feature. Wider rotation, stronger locking control, or longer arm extension may suit some driving situations, while a simpler fixed-angle design may suit others. For broader context on mount types and related accessories, visit the car phone mount hub.
This chart shows how to evaluate adjustment features based on driving context and key feature groups to select the right mount.
Here are product examples that may make comparison easier. Before buying, always review the compatibility criteria, essential features, and product details.