Car key shell replacement mistakes that cause bad fit, dead buttons, or a shell that won’t close
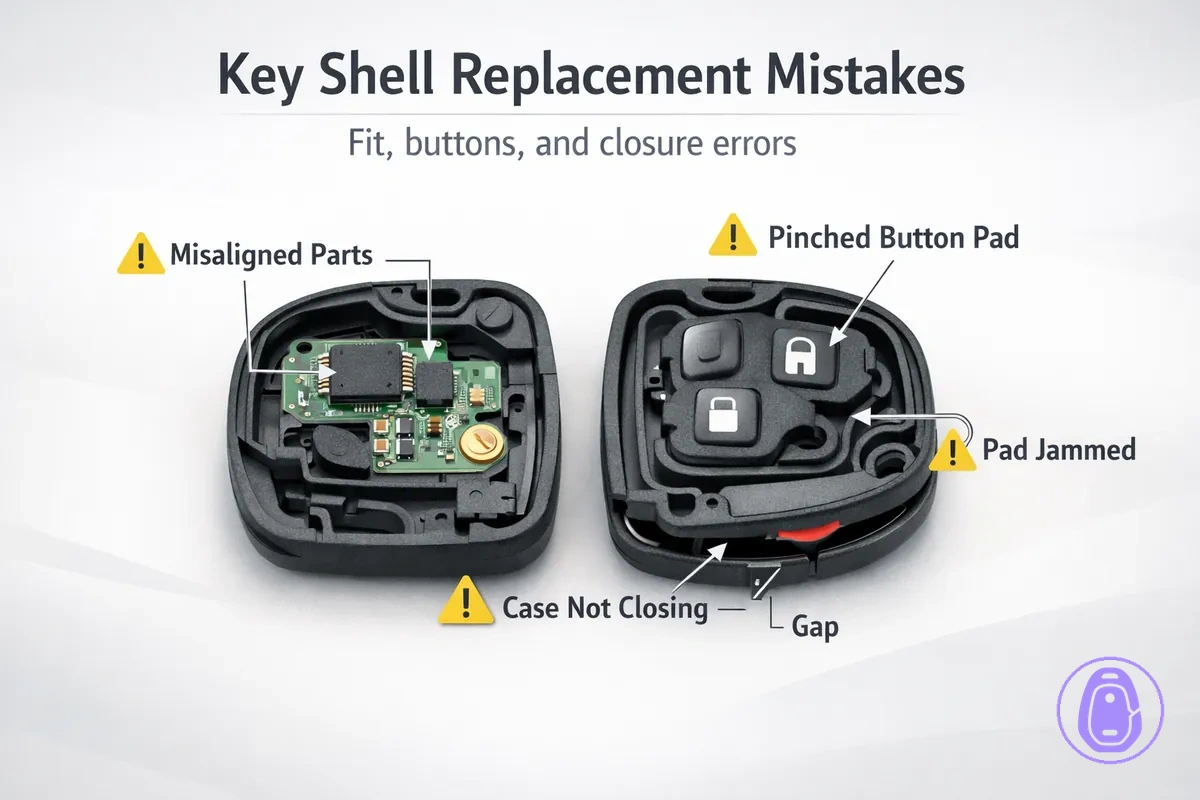
Car key shell replacement mistakes happen when you swap the housing but keep the internal electronics intact. They lead to bad fit, dead buttons, or a key fob shell that won’t close. Shell-caused issues show up as gaps at the seam, buttons with no travel or contact, or clips that fail to snap shut.
- wrong key fob shell match for the key type prevents alignment on internal posts
- opening damage from prying clips too hard breaks tabs
- internal transfer misalignment shifts the board from button pads
- button pad errors pinch edges or block contact
- closure mistakes overtighten fasteners and warp the enclosure
Check dead batteries or worn electronics first. They mimic shell failures but fall outside housing replacement. Never force the shell to close—it damages clips or internals further.
- Physical fit or closure symptoms: seam gap or uneven halves, loose clips or broken tabs, shell won’t snap shut.
- Button symptoms from shell: no button travel, poor pad contact, pinched edges.
- Electronic-only symptoms: no LED light despite good fit, reduced range with flush closure, total unresponsiveness after battery swap.
- Triage cue: Buttons worked before shell swap and internals align? Check housing first.
When the problem is not the shell swap
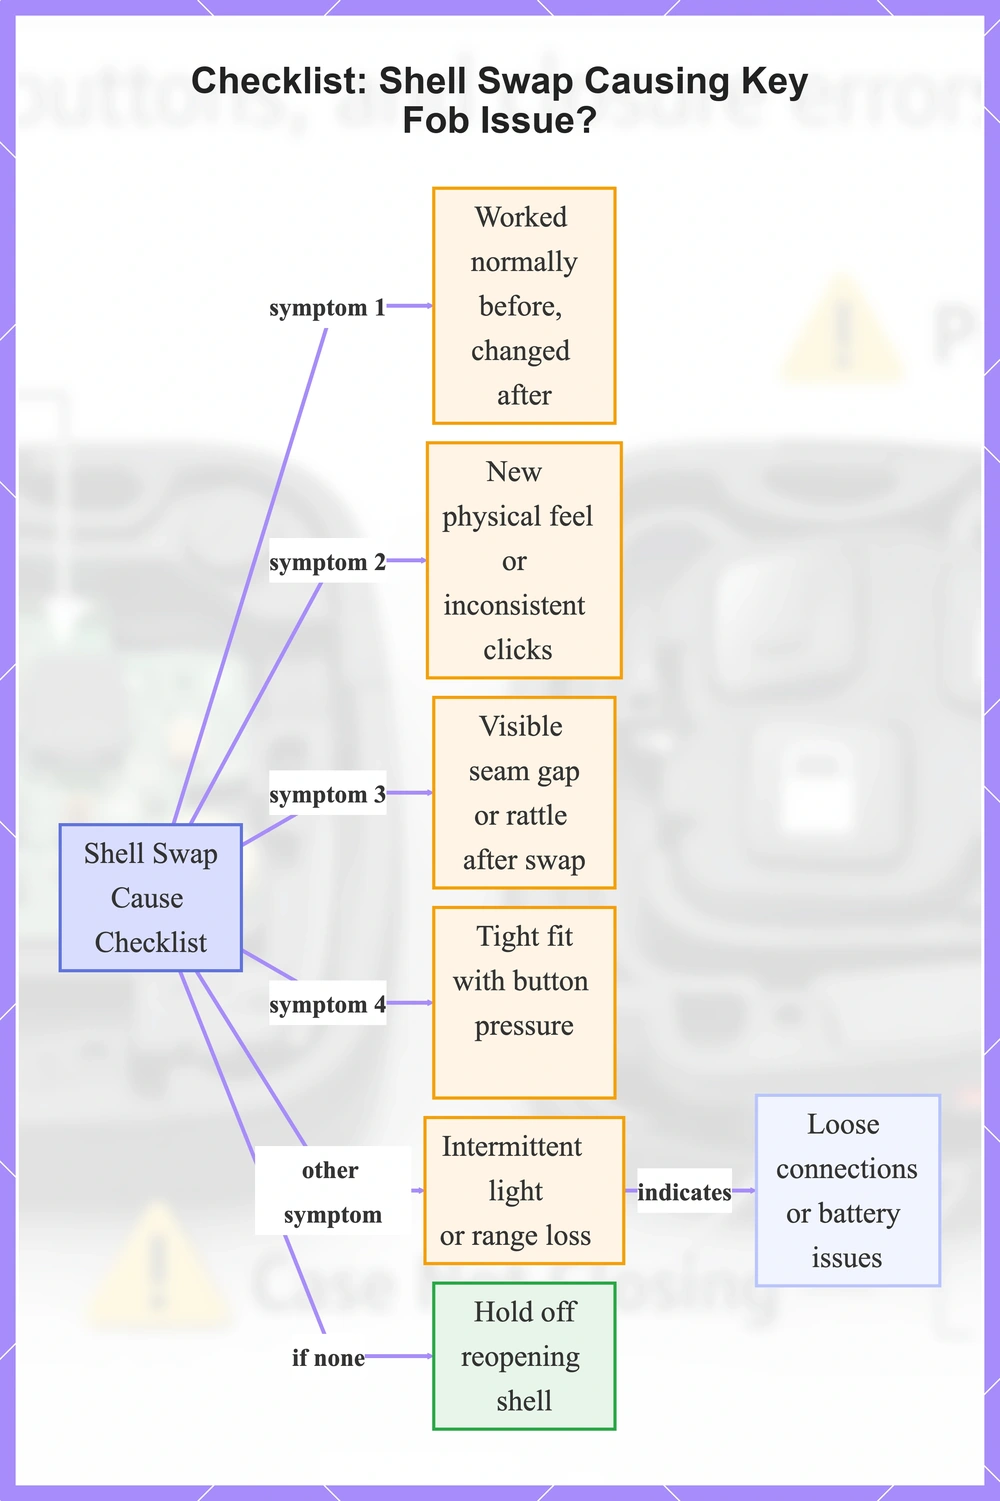
Use this checklist first to see if symptoms point to the shell swap or other causes.
- Key worked normally before the swap but changed after.
- New physical feel or inconsistent button click appeared after the swap.
- Visible seam gap or rattle developed after the swap.
- Tight fit with new pressure on buttons or case.
- Symptoms like intermittent indicator light or range loss may indicate battery issues rather than physical changes.
- No seam gap, rattle, or tight fit, yet range drops sporadically.
If none of these point to the shell swap, hold off reopening the shell.
People often think shell swaps disrupt key functions. Issues can mimic housing problems but come from loose connections or battery contacts.
Intermittent range even if it worked normally before the swap points to battery drain, not shell fit. If unsure, verify internals seat properly first. Back to replacement hub.
Do I need to reprogram after a shell swap?
Typically not, if only the housing changed and electronics stayed intact.
Can a shell swap stop the car from starting?
Rare from housing alone; other factors like battery often play a role.
This flowchart lists key symptoms to check if they point to shell swap problems or other causes like battery issues, guiding whether to reopen the shell.
Physical housing faults versus battery, electronics, and programming symptoms
| Mechanical sign | Non-mechanical sign |
|---|---|
| Mushy tactile travel and poor button pad contact—no snap. | Normal travel and contact, but intermittent response that may signal battery issues. |
| Seam gap or no flush snap closure. | Flush seam, but buttons fail intermittently. |
| Indicator light works steadily most times, but buttons show no response. | Indicator light flickers or dims erratically. |
| Consistent failure across all uses. | Intermittent failure, often with power fluctuations. |
Mixed symptoms call for seating and closure checks before assuming non-housing causes.
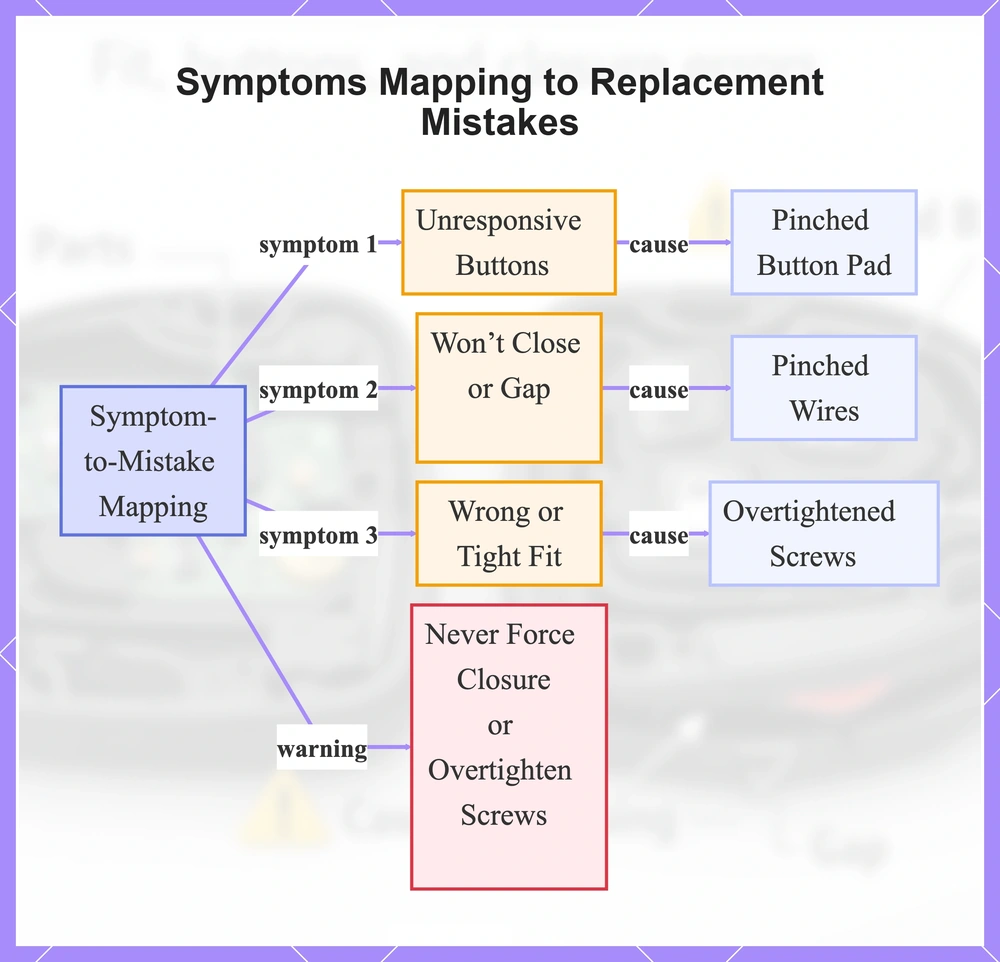
Symptom-first mapping from failure to likely replacement mistake
- Symptom: Unresponsive buttons
- Pinched button pad blocks contact.
- Misalignment causes poor battery contact.
- Mis-seated circuit board.
- Symptom: Won’t close or gap
- Obstruction from debris or extra parts.
- Mis-seated housing halves.
- Pinched wires prevent full closure.
- Symptom: Wrong or tight fit
- Mismatch in blade area dimensions.
- Overtightened screws deform the hinge.
- Incorrect model variant.
- Symptom: Broken clips during opening
- Clip damage from pry tool use.
- Snapped tabs from repeated force.
Warning: Never force closure or overtighten screws—you'll snap parts.
Failures rarely have a single cause. These mappings point to common mistake classes from typical cases. Confirm by inspecting for these signs.
This flowchart maps common repair failure symptoms to likely replacement mistakes with a key warning.
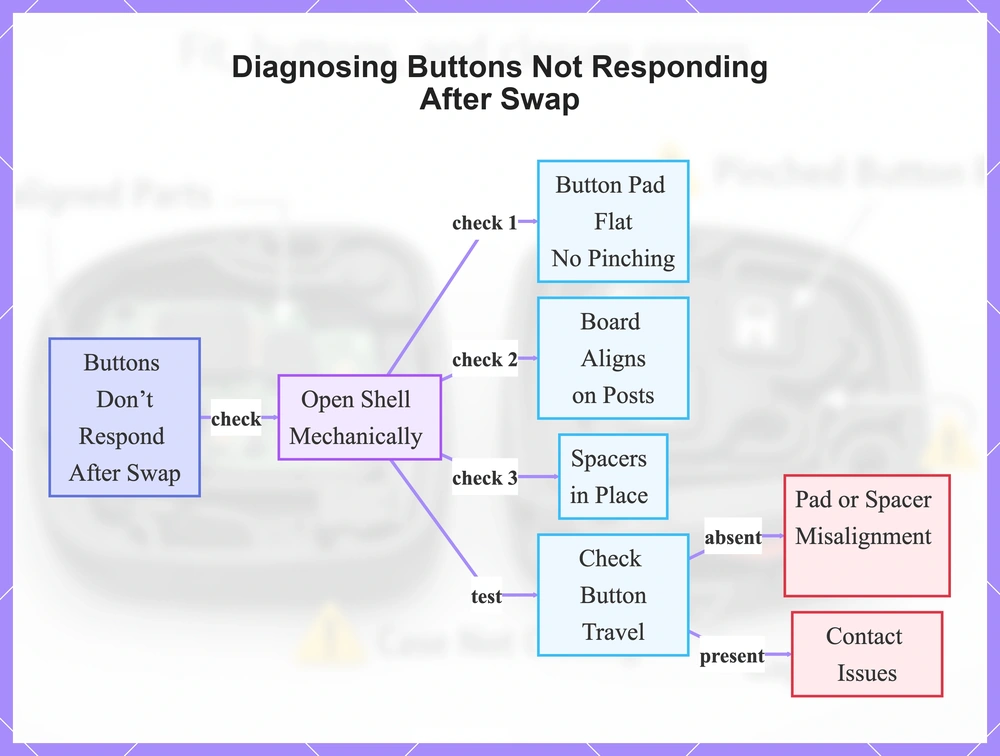
Buttons don’t respond after the swap and what it usually indicates
Reassembly mistakes often block button pad contact or board alignment.
- Pinched or shifted button pad:
- Button pad pinched at shell seam edge blocks membrane contact.
- Shifted rubber pad blocks proper button travel.
- Misaligned board seating:
- Board not fully seated on alignment posts.
- Missing spacer layers:
- Missing spacers change button height and tactile click.
- Wrong shell button geometry:
- Incorrect button dimensions cut responsiveness.
Open the shell to confirm mechanically. Check if the button pad sits flat without pinching along edges or seams, the board aligns on posts, and spacers stay in place.
Press buttons to check travel present versus absent: present travel but no response means contact issues, absent travel points to pad or spacer misalignment.
If mechanical checks pass, see Buttons not working fixes for further diagnosis.
This flowchart shows what unresponsive buttons after reassembly usually indicate and the mechanical checks including button travel test to diagnose the issue.
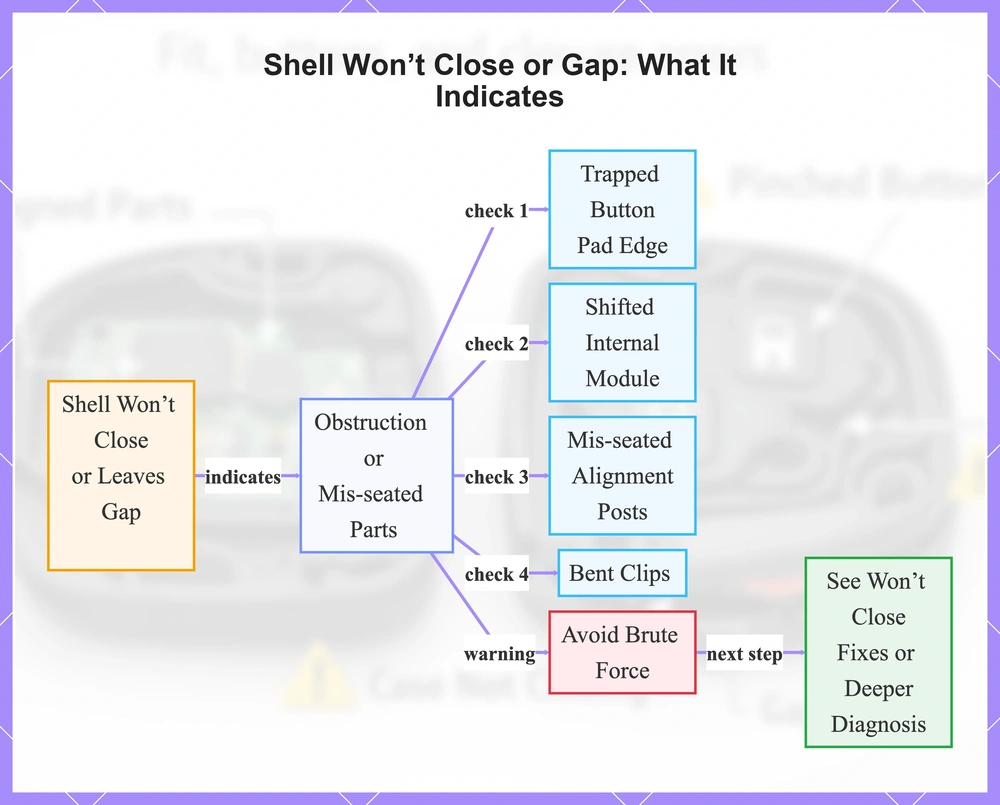
Shell won’t close or leaves a gap and what it usually indicates
A shell that won’t close or leaves a gap along the seam usually signals obstruction or mis-seated parts rather than needing more pressure.
- Inspect for a trapped button pad edge blocking the halves from sitting flush.
- Check if the internal module shifted, obstructing closure.
- Verify alignment posts are mis-seated or caught.
- Look for bent clips preventing even contact between halves.
- Examine the screw length; wrong length can pull halves out of plane, causing warped halves or an uneven seam.
Avoid brute force—forcing clips risks stripping alignment posts.
A stubborn gap might tempt you to overtighten, but a wrong shell match—even if the outline looks similar—can mimic this and prevent the halves from sitting flush. See Won‚Äôt close properly fixes for targeted steps. If basic checks don’t reveal the issue, move to deeper diagnosis.
This flowchart shows what a shell that won’t close or leaves a gap usually indicates, key checks for obstructions or mis-seated parts, a warning, and next steps.
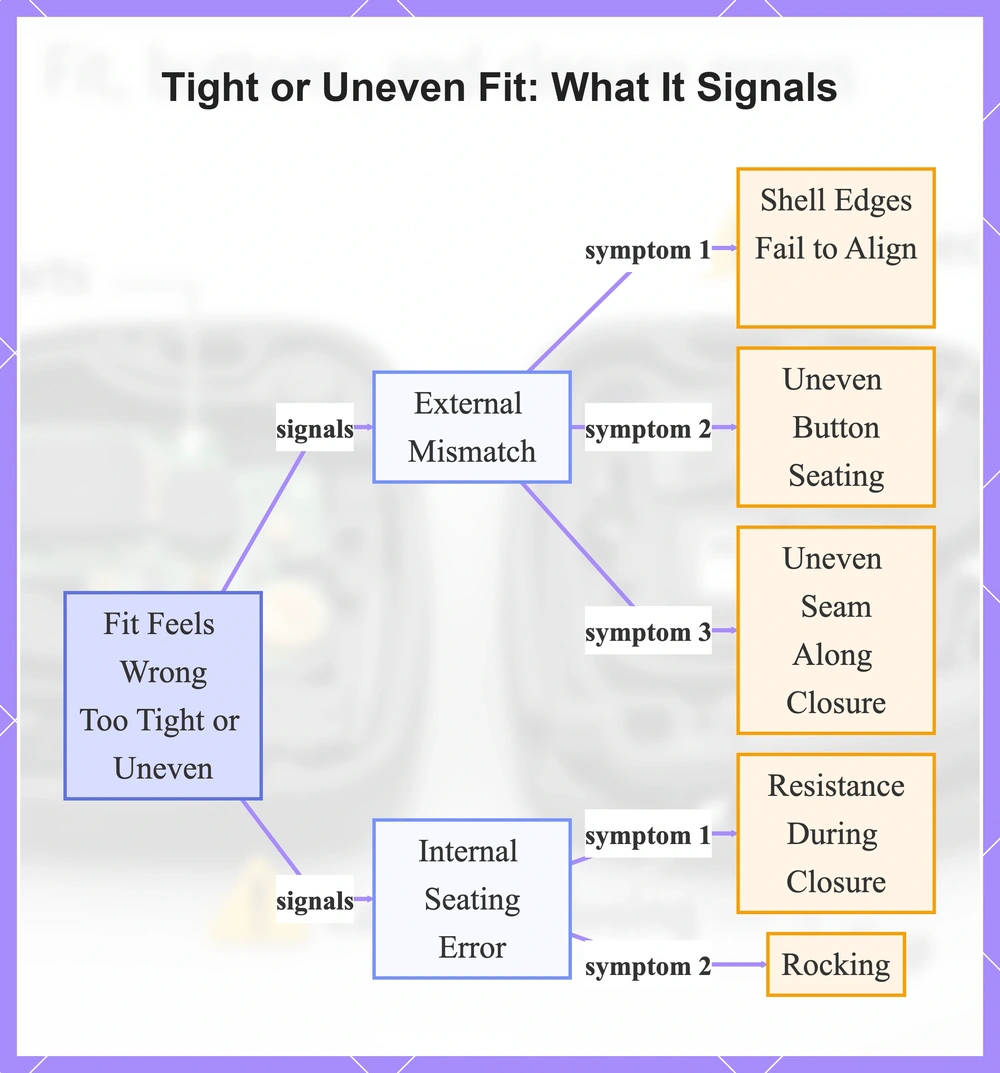
Fit feels wrong, too tight, or uneven and what it usually indicates
A tight fit, uneven seam, or rocking often signals outline mismatch, button spacing mismatch, or internal seating error.
External Mismatch Signals
- Shell edges that fail to align properly from outline mismatch.
- Uneven button seating from button spacing mismatch.
- Visible uneven seam along the closure line.
Internal Seating Signals
- Tight fit or resistance during closure from hinge interference.
- Tight fit in the blade area from interference there.
- Pressure point where misaligned internals push against the shell.
- Rocking from poorly seated internals.
- Looks aligned externally but feels tight internally, indicating mis-seated internals.
Tight fit with smooth, even closure is correct, unlike forced deformation that often causes pressure points or rocking.
This flowchart shows how a wrong-feeling fit signals external mismatches or internal seating errors via specific observable symptoms.
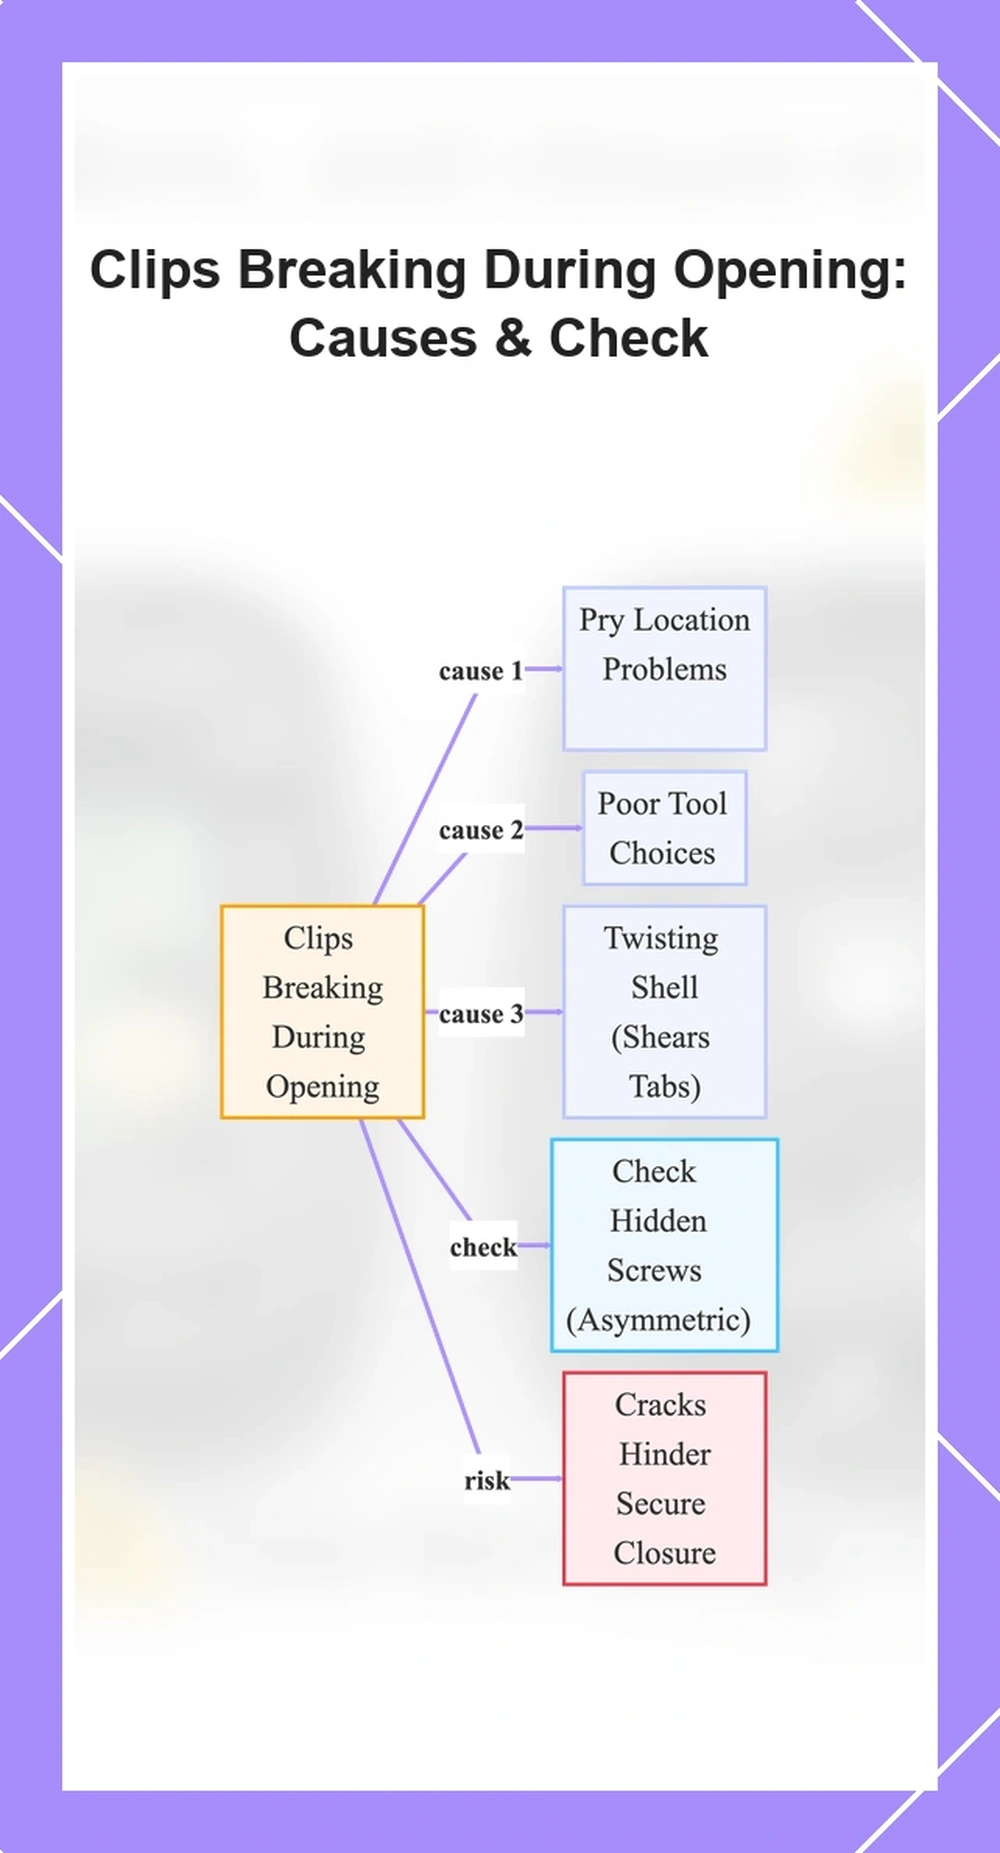
Clips break during opening and what it usually indicates
Clips or tabs breaking during shell opening usually signal pry location problems, tool choices, or brittleness—not routine steps.
Such breaks can cause cracks that make secure closure harder later.
- Levering with a pry point at clip edges or seam lips can snap clips by focusing force directly on them.
- Twisting the shell instead of sliding can shear brittle tabs.
- Using metal tools can gouge clips and accelerate breaks in aged plastic.
- Missing a hidden screw can create asymmetric resistance, leading to cracks in surrounding clips.
Caution: Stop and check for hidden screws if one side separates while the other does not.
This flowchart shows typical causes of clips breaking during shell opening, a related risk, and a key cautionary check.
Mistakes that start with the wrong replacement shell
A wrong replacement shell doesn’t match the original in key fit areas. That causes assembly problems like improper seating, button issues, or closure stress—even if it looks compatible at first glance. The outline, button layout, blade slot, hinge type, and locating posts must match for proper internal fit. When the shell does not seat fully or buttons misalign during trial fit, stop forcing assembly and perform Compatibility checks.
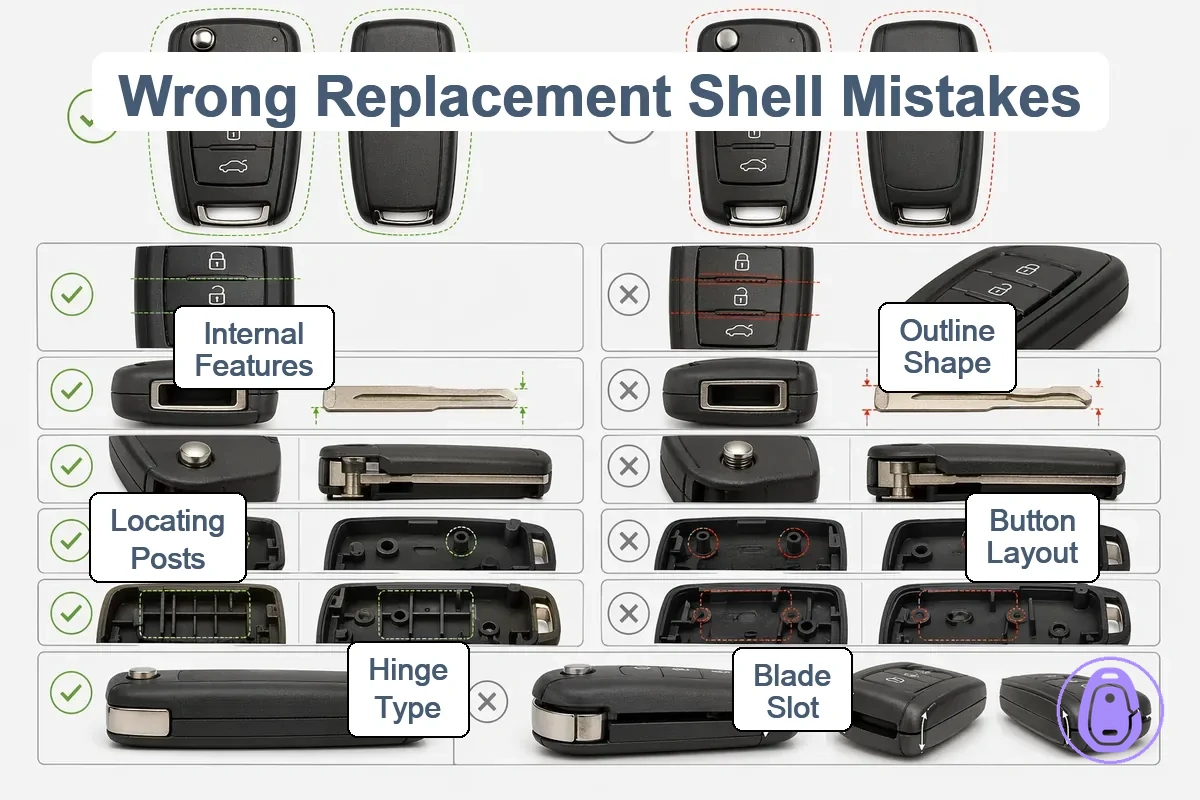
These elements must match the original shell:
- Overall outline shape to prevent outer interference and ensure the same shape.
- Button layout geometry for correct positioning and button press without offset.
- Blade slot dimensions to fit the key blade without binding or looseness.
- Hinge or pivot type to match the swing motion and avoid interference.
- Locating post positions for secure internal fit and proper seating.
- Internal fit features like ribs or clips that guide component seating.
- Near-miss trap: Similar outline but shifted button layout causes press failures.
- Near-miss trap: Matching blade slot width but wrong depth blocks full insertion.
- Near-miss trap: Similar hinge but mismatched pivot angle prevents closure.
Same model/year, why does the shell not fit?
Trim variations or revisions can alter button layout or locating posts, so verify those beyond the model alone.
Outline matches, why do buttons feel wrong?
Button cutouts might line up visually but vary in depth or travel, leading to internal fit problems.
Mismatch signs in shell shape and button layout
Look for these visual and tactile mismatch cues before forcing closure or tightening screws:
- Misaligned button cutouts that don't line up with the towers, preventing buttons from seating properly or blocking full insertion.
- Spacing around button cutouts too tight or loose for smooth button presses.
- Uneven perimeter contact creating visible gaps, seams, or tactile resistance along the edges.
- Button towers that don't line up with the button pad underneath.
- Button pad sitting off-center under button towers, which can alter press travel.
Even similar outlines can still differ at button towers.
Small geometry differences often make a shell look close but function incorrectly. This can lead to stuck buttons or poor tactile feedback that varies by shell design. Don't force it—verify compatibility first.
Blade-area and hinge differences that prevent proper seating
Outlines may look the same, but mismatches in blade slot, hinge, and pivot details prevent flush seating due to interference or misalignment.
- Hinge pin position: Looks the same, but slight shifts disrupt pivot alignment, forcing the halves apart.
- Blade slot dimensions: Looks the same, but width or depth variations do not match blade thickness, causing binding.
- Blade shape constraints: Looks compatible, but contour differences cause the blade to rub slot edges, creating interference.
- Pivot mechanism offset: Looks aligned, but misaligned points create uneven pressure, preventing full seam contact.
- Interference points: Looks clear, but protrusions near blade area or hinge catch opposing halves, preventing seating.
Forcing a hinge mismatch can crack posts or deform the seam.
Opening the old shell in ways that break clips, tabs, and posts
Opening the old shell the wrong way breaks clips, tabs, posts, and clip rails. This leads to closure problems later.
- Don't: Release tabs individually. Press opposing pairs with gentle inward pressure first.
- Don't: Pry directly into the seam, as this can twist and crack tabs.
- Don't: Pry clips non-sequentially from multiple sides. It increases bending stress.
- Don't: Apply leverage unevenly, which can deform posts.
- Don't: Use pry aids that mar the shell. Check the Tools checklist for non-marring options.
- Don't: Ignore resistance along the seam lip.
- Don't: Force the pry outward on standoff posts.
- Don't: Twist stuck sections with high leverage. It risks cracking clip rails.
Wrong pry direction or poor clip sequencing creates bending forces that deform the clip rail. That hinders secure reassembly.
Warning: Hidden screws create asymmetric resistance. For instance, a subtly bent clip rail may snap closed at first but cause looseness and gaps over time.
Sudden resistance midway along a seam lip during tab release signals a hidden screw underneath. Stop prying, inspect closely, and check before going on to protect posts and clip rails.
Prying points that snap clip-closure edges
Avoid prying where the seam is thinnest.
- Levering directly at the edge can force the seam lip outward, snapping the clip-closure edge.
- Prying under the corner can twist the rail, cracking the surrounding clip structure.
- Forcing into thin seam lips instead of reinforced joints can snap the fragile clip-closure edge first.
Use controlled separation with even pressure, and stop at first resistance to avoid snaps.
Disassembly slip-ups that lose or deform small internal parts
- Small screws on posts (varies by key type): strip or drop easily, leaving loose assembly that rattles over time.
- Spring under buttons: slips into crevices, making button travel and feel sluggish or unresponsive.
- Membrane switches: prying tools deform them, turning button feel sticky or dead.
- Alignment piece: drops out unnoticed, keeping parts from seating flush and causing misalignment.
- Tiny standoffs or clips: bend under forceful separation, ruining button travel and button feel.
- Spacer: a missing one leaves a seating gap so the shell won’t close properly, mimicking a wrong-shell fit.
Internal transfer mistakes that misalign modules inside the housing
Mis-seating the internal module stack during transfer can cause button failures and keep the shell from closing properly, even when the shell match is correct. The module stack—including the board, spacers, and membrane—must align properly on posts to hold the right stack height and pressure. Depending on shell design, misalignment can lift the internals too high and create uneven seams or binding. Diagnostic cues: localized gap or rocking feel along the seam, or dead buttons with no response.
Common transfer mistakes:
- Flipped orientation of the module, leaving a gap so the seam may not close evenly.
- Missing spacers between components, leading to excess compression or button play.
- Trapped membrane under the board, blocking flat closure and raising one side.
- Over-insertion of the board past posts, compressing the stack and jamming the lid.
- Components catching on housing edges, tilting the module stack.
- Board not fully seated on posts, disrupting stack height and causing instability.
Alignment post and standoff misplacement that shifts the internals
When alignment posts and standoffs are misplaced, the internals aren't seated properly on supports—they shift instead.
- Uneven board height with one edge higher than the other
- Module rocks or binds at pressure points when closing
- Visible gaps along the seam from poor support contact
- One side closes first—if so, reopen and re-seat
- Resistance or catching halfway through closing
- Replacement shells may include extra posts that do not correspond to the original layout, potentially causing mis-seating.
Wrong screw choice or overtightening that warps the housing halves
Wrong screw choice or overtightening can warp housing halves. Pressure on threads and posts causes bowing and uneven seams, depending on housing material and design.
- Excessive screw length bottoms out inside the housing, warping areas near seams.
- Poor thread fit causes cross-thread damage and stripped posts that loosen over time.
- Overtightening one side first leads to bowing and gaps on the opposite seam.
- Threads that do not match housing posts strip under torque, worsening seam alignment.
- Excessive torque crushes post material, causing bowing of the housing outward.
- Cross-thread starts prevent proper seating and create uneven seam pressure.
A gap that worsens after tightening calls for stopping to reassess screw length or seating. Verify seam alignment before final tightening.
Button pad mistakes that make buttons feel dead, stuck, or unreliable
Button pad mistakes can change how buttons feel by interfering with the membrane's placement against button towers or restricting mechanical travel through improper compression or positioning of the rubber pad. This leads to a stuck feel, no responsiveness, or unreliable presses. No travel often signals mechanical blockage, while travel but no function may point to contact problems, though other factors can play a role after mechanical checks.
- Pinched edge at seam: Uneven compression makes the membrane catch during presses, creating a stuck feel.
- Flipped rubber pad: Wrong side faces towers and reverses contact points, causing unreliable presses.
- Sliding out of alignment: Pad shifts away from towers, leading to inconsistent travel and responsiveness.
- Missing spacer layer: Excessive compression makes buttons unresponsive with no distinct travel.
- Debris under pad: Debris builds at contact points for intermittent function that works sometimes but sticks otherwise.
- Misalignment with button towers: Blocks full travel on press, resulting in mushy or unreliable feedback.
- Not seated flat: Uneven membrane tension mimics stuck or unresponsive behavior across multiple buttons.
- Over-compressed pad: Flattens pad prematurely, reducing travel and creating lifeless press.
Check that the pad sits seated flat without folds or shifts.
No travel vs. travel but no function
- No travel: Pinched pad or debris blocks mechanical movement.
- Travel but no function: Debris at contact or misalignment with towers affects responsiveness, though other factors may contribute after mechanical confirmation.
Pinched, flipped, or shifted button pad during closure
During shell closure, the button pad can get pinched, flipped, or shifted, blocking button travel or contact since shell designs vary.
- Seam edge pinches the pad edge: the pad stays stuck and can't flatten.
- Pad not seated flat in its pocket: causes uneven closure and mispositioned contact.
- Button towers push the pad sideways during snap: displaces the pad from proper alignment.
- One side snaps first: the pad can shift, creating gaps in button response.
Reopen before further force if a button feels stuck immediately after closing.
Closure pressure should feel even, not snapping one side first.
Contact and travel issues caused by debris, missing layers, or mis-seating
Debris, missing layers, or mis-seating can disrupt contact or travel without an obvious pad pinch. If symptoms change with pressure, suspect contact or compression rather than programming.
Debris issues
- Dust or debris can block consistent contact and cause intermittent signals.
- Plastic burrs can disrupt contact points and create intermittent function.
Missing-layer issues
- A missing conductive layer can prevent signal travel.
- A missing spacer layer can cause no click during travel.
Seating issues
- A pad not seated flat on its support surface can reduce consistent contact under normal press.
- The button works only when pressed hard, signaling a contact or compression gap.
Closure mistakes that keep the shell from snapping shut or sitting flush
Use this checklist to spot common issues that stop the shell from snap shut or sit flush with an even seam.
- Look for obstruction from trapped pad edges creating a gap along the seam.
- Check if mis-seated clips block the clip path.
- Inspect for internal stack height problems from uneven pad placement.
- Examine for warped halves that hinder alignment.
- Confirm posts aren't missing or damaged, as they guide closure.
- Rule out shell-half mismatch affecting the clip path.
Forcing closure can permanently weaken clips and create recurring gaps. If you notice uneven resistance or binding after these checks, reopen the seam instead.
Many think extra pressure solves closure problems, but that overlooks how clips and posts align along the clip path. Force skips checking obstruction, stack height mismatches, or warped parts, which can cause misalignment.
Clip closure mis-seating and forced snapping that bends the join line
Mis-seating blocks proper clip engagement. It often bends the join line and leaves permanent gaps from partial engagement or rail deformation.
- Partial engagement leaves a visible gap at one end of the join line. The clip latches unevenly without full rail contact.
- A gap at one end only often signals partial engagement before mismatch.
- Force deforms the clip rail, pushing it out of shape. This blocks clean closure and bends the join line.
- Forced snapping one rail side first warps alignment and bends the join line so it won’t close fully.
- Repeated force cycles on mis-seated clips can raise brittleness and cause clip loss or looseness.
Gaps from trapped components, shifted internals, or uneven pressure
The gap location points to trapped components, shifted internals, or uneven pressure inside the car key shell. A localized gap usually signals an obstruction like a trapped part, while a uniform gap might mean mismatch or warping.
- Edge gaps along the perimeter or near thinner sections come from pad pinch—the pad sticking and creating uneven seam pressure—or trapped components pressing outward at the seam line.
- Hinge-area gaps stem from blade or hinge interference blocking full closure. Resistance there can point to shifted internals causing a localized bulge or obstruction.
- Broad gaps across the shell link to stack height problems or warping from uneven pressure. Twisting often comes from overtightened assembly.
Correct closure brings even perimeter contact without localized bulges, though designs can vary.
Post-swap checks that catch errors before they become damage
Right after swapping, run these short, testable checks to catch errors before clips crack or posts strip.
- Confirm dry-fit alignment: posts seat properly without clips or screws.
- Check seam uniformity: gaps sit flush and even around edges.
- Test button travel: buttons move consistently without sticking.
- Verify shell body shows no visible warp or twist.
- Inspect clip positions: aligned and undamaged.
- Test screw holes: threads intact before insertion.
- Test before final tightening to avoid stripping posts.
Errors pile up if you skip straight to tightening, so follow this order: loose dry-fit alignment and seam uniformity first, button travel next, then tighten evenly using a stop condition (don’t force). This sequence catches fit issues early when adjustments stay easy and prevents forces that warp parts or strip posts. For shells relying mostly on clips versus screws, skip screw checks but double-verify seam uniformity. Back to replacement hub.
Dry-fit and alignment checks before final snap or screw-down
- Visually align the posts with no gaps.
- Gently press the internal module until it feels fully seated.
- Check pad edge clearance for even spacing around the perimeter.
- Confirm even seam contact where the halves meet flush.
- Slide the halves together smoothly with no force.
A resistance point in one corner usually signals trapped material or mis-seating; reopen and re-seat.
Button and closure validation after assembly
Before daily use, confirm your assembly matches expected mechanical behavior.
- Button feel checks:
- Consistent button travel across all pads
- Smooth tactile response without sticking
- Seam and closure checks:
- Uniform seam around the shell
- Closes flush with no gap
- Clips engage securely
- No rattle from mis-seated parts
If buttons feel normal but functions fail, treat as non-housing after mechanical confirmation.
When to stop reassembly attempts and move to symptom-based troubleshooting
Stop forcing reassembly attempts to prevent compounding damage from repeated efforts if these stop conditions appear:
- Cracked clips after repeated attempts
- Deformed seam from forced alignment
- Stripped posts showing looseness or gaps
- Persistently unresponsive buttons despite verified seating
- Visible scratches or wear on mating surfaces
- Screws that no longer hold tension
- Play or gap after full clip engagement
Before escalating, note specific symptoms, number of attempts, tools used, and photos of damage sites such as stripped posts or deformed seams. For instance, if buttons stay unresponsive after verified seating, switch to symptom-based troubleshooting instead of repeating the swap.