Car Key Shell Buttons Unresponsive After a Shell Replacement
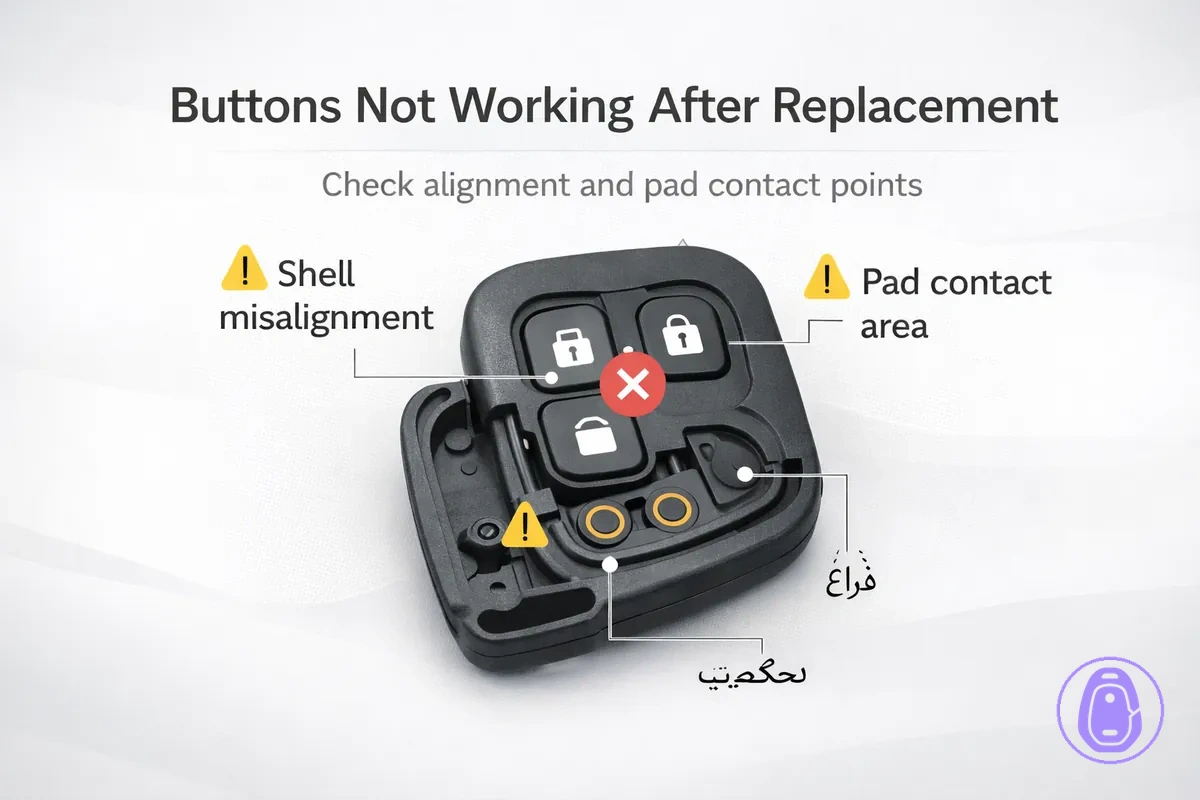
Buttons unresponsive after a car key shell replacement means the key fob buttons fail to register presses for functions like lock, unlock, or start. The problem usually comes from disrupted button travel or poor switch contact in the mechanical press chain. It focuses on post-replacement responsiveness in the shell assembly, not battery or programming issues.
Diagnose common cause classes behind unresponsive key fob buttons and find safe fixes that fit variations in button pad design, closure styles, and key fob internals. A correct shell match can still fail from poor internal seating, while an incorrect one often mimics assembly errors. Outcomes depend on the specific alignment of the rubber membrane, button pad, PCB, and microswitch—the shell replacement changes in the press chain explain these differences.
- Stiff buttons (hard to press or stuck): Suggests blocked button travel from obstructions, tight closure, or misaligned shell halves.
- Clicks but no response: Points to failed contact where the rubber membrane or button pad fails to reach the PCB microswitch.
- Intermittent across buttons: Often ties to uneven seating or offset in the PCB or membrane alignment.
What the shell replacement changes that affects button press and switch contact
The press chain in a car key shell runs from the outer button cap through the rubber membrane to the microswitch on the PCB. When pressed, the button cap pushes the rubber membrane, which compresses to complete the circuit at the microswitch. Shell replacement alters this chain because the new shell halves introduce different geometry that affects how force transfers along the path.
Small differences in tolerance between the old and new shell can shorten travel distance or change compression on the rubber membrane. Button pad thickness variations may prevent full contact with the microswitch, while alignment posts that shift position can offset PCB seating and cause wobble or standoffs to misalign. These fit issues around shell halves and closure tension often lead to unreliable presses. The main problems separate into button travel blocked, where the cap or membrane cannot move freely, versus switch contact not reached, where movement occurs but the circuit fails to close.
A pad too thick, for example, can block compression even with normal travel, while poor PCB seating might allow travel but leave the microswitch out of position under the rubber membrane.
| What changes | Why it stops buttons |
|---|---|
| Travel distance | Reduces rubber membrane compression needed for microswitch activation |
| Button pad thickness | Prevents full contact despite button cap movement |
| Alignment posts position | Shifts shell halves, binding the press chain |
| PCB seating | Offsets microswitch from rubber membrane contact point |
| Changes with shell replacement | Does not change |
|---|---|
| Travel distance, pressure on membrane, alignment of components | Electronic function of circuit board when untouched |
Symptom patterns after a shell swap and what they usually indicate
The symptom pattern after a car key shell swap narrows the likely cause class and points to where to inspect first. Total unresponsiveness across all buttons commonly signals a broad contact or travel disruption. Observing the exact feel helps prioritize mechanical issues over other factors.
A stiff button press that still registers a response often means travel is blocked or obstructed before reaching the microswitch. In contrast, a button that clicks with normal travel but shows no response usually indicates the contact point was not reached due to alignment or offset problems. This distinction guides whether to check obstructions first or seating issues next.
- No buttons work often indicates complete button travel blockage or no microswitch contact from pad seating issues.
- Some buttons work while others do not usually suggests alignment problems or PCB offset affecting only certain positions.
- Stiff presses commonly result from obstructions or stuck components blocking normal travel.
- Intermittent response or on-and-off behavior can mimic low battery if range seems worse, though mechanical seating often contributes.
- Uneven feel or inconsistent press across buttons typically signals pad geometry mismatch or uneven closure pressure.
- Buttons stuck in place frequently point to shell tension or debris obstructions preventing any movement.
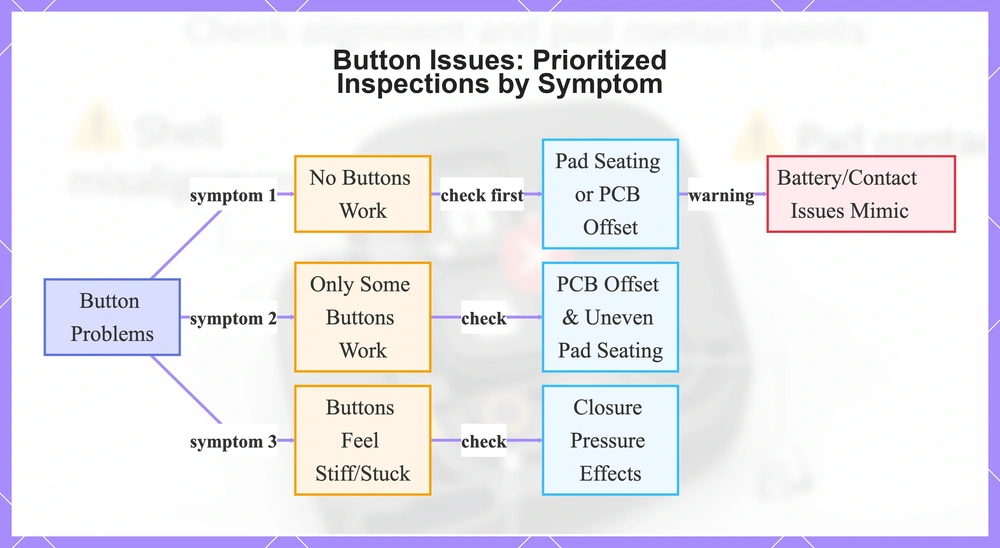
This flowchart shows key symptom patterns after a car key shell swap and what they indicate to guide initial inspections.

No buttons work vs only some buttons work vs buttons feel stiff or stuck
The three buckets—no buttons working, only some buttons working, or stiff buttons—shift inspection focus to different areas first. No buttons suggests pad seating or PCB offset issues, some buttons partial alignment problems, and stiff buttons closure pressure effects. Prioritize these:
- No buttons work: inspect pad seating and PCB offset first, as battery/contact issues can mimic this.
- Only some buttons work: check PCB offset and uneven pad seating at affected positions.
- Buttons feel stiff or stuck: examine closure pressure, button binding, and seam gap from over-tightening or fit pressure.
This flowchart shows the three main button problem types and their initial inspection focuses, including a mimic warning for no buttons working.
Before reopening the shell: quick rule-outs that mimic a shell-button failure
These quick checks rule out simple power or contact issues that can mimic unresponsive car key shell buttons after replacement and prevent unnecessary reopening of the shell.
Battery seating, contact cleanliness, and basic key fob indicators often cause intermittent unresponsiveness that feels like a button failure, especially if linked to replacement mistakes. Run through this pass/fail checklist without tools to confirm.
- Battery seated properly if it does not rattle or move freely inside the compartment.
- Battery contacts clean and free of corrosion or residue if metal surfaces shine without dull oxidation or grime buildup.
- Battery in good condition if key fob range stays consistent without sudden drops in distance.
- No weak signal from low battery if presses work reliably at normal range rather than only up close.
- Indicator light (if present) bright and steady during presses, not dim or flickering intermittently.
- Response not purely intermittent if buttons register consistently when battery and contacts pass other checks.
- Overall power stable if no recent drops in range or light output match button failure timing.
If these checks pass and buttons remain unresponsive, the issue is likely inside the shell assembly. If travel feels stiff, skip to physical causes even if battery is OK.
This flowchart shows the pass/fail checklist to rule out battery, contact, and power issues mimicking unresponsive shell buttons after replacement.

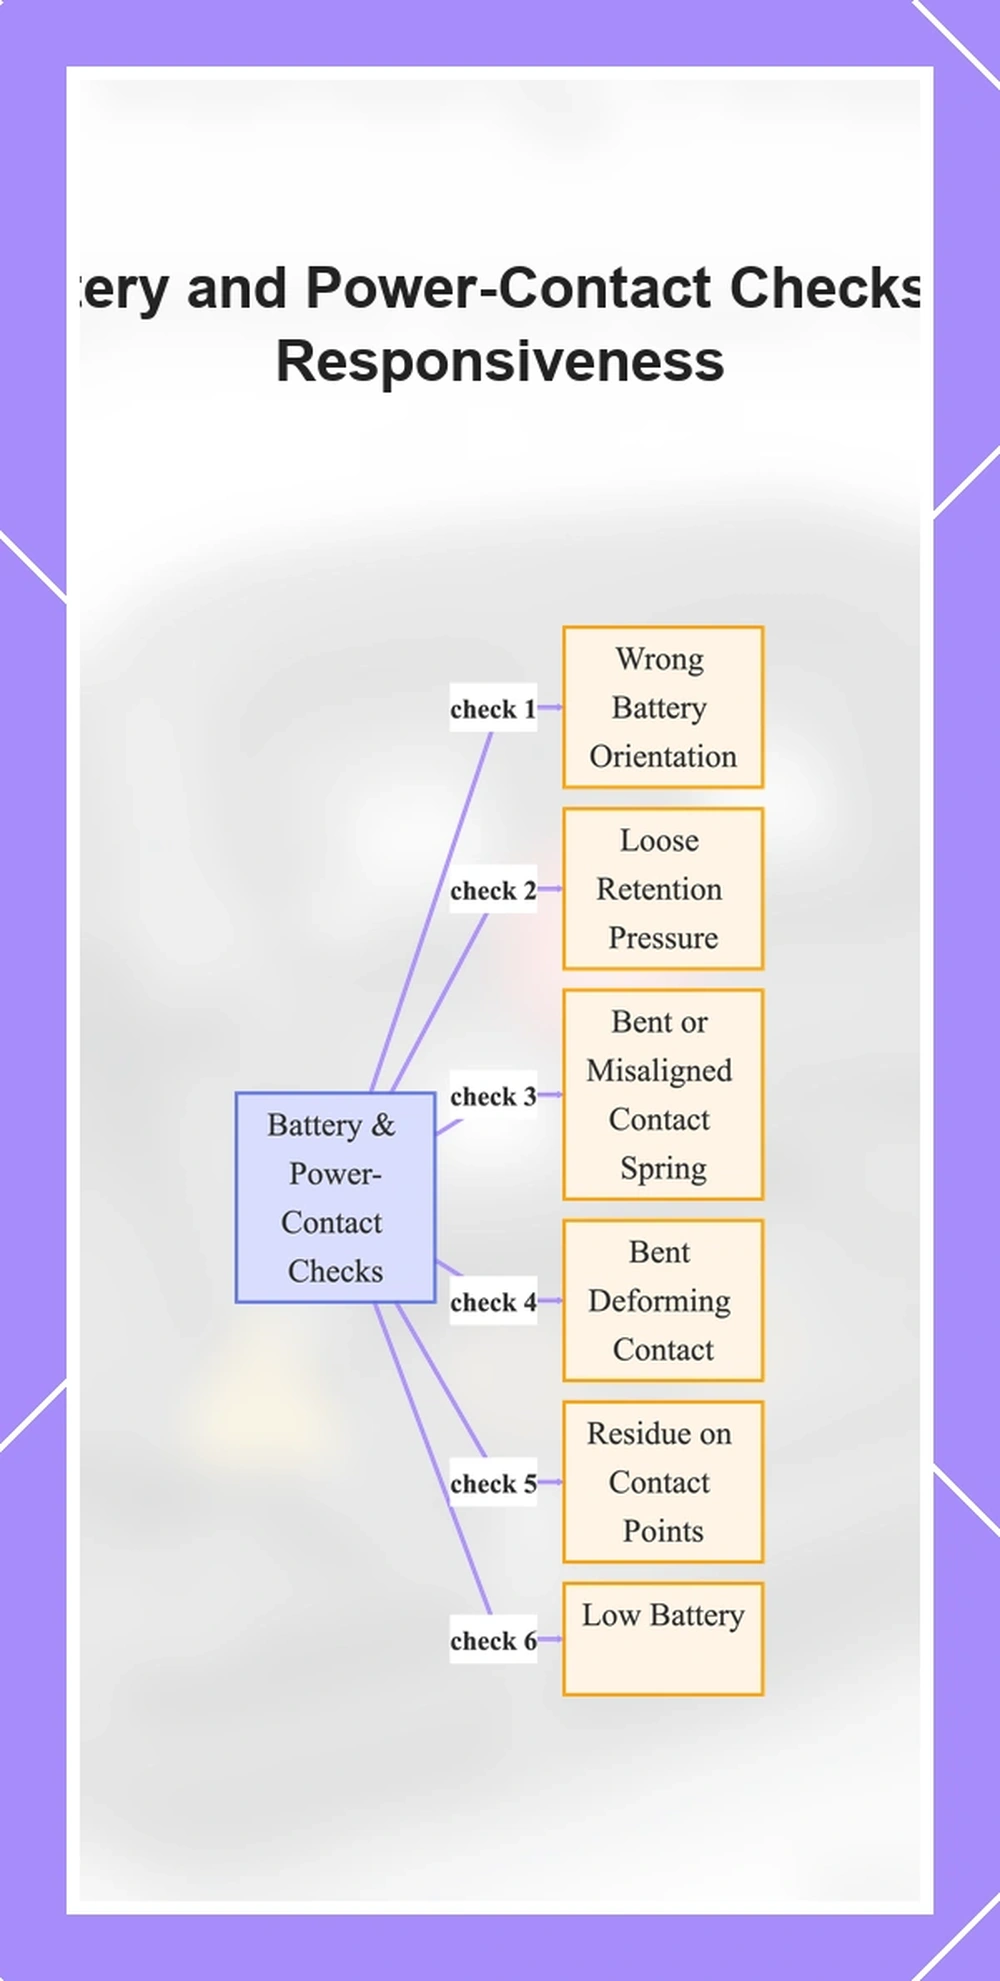
Battery and power-contact checks that affect responsiveness and range
Check battery orientation, retention, and contact spring alignment to rule out power-related non-response.
- Battery orientation wrong: battery does not sit flat or shifts during handling, which may prevent steady contact.
- Retention or hold-down pressure loose: battery moves freely inside compartment when gently shaken.
- Contact spring bent or misaligned: contact does not press evenly against battery faces, showing gaps or poor seating.
- Bent contact deforming: metal contact visibly warped or flattened, which may fail to maintain firm pressure.
- Residue on contact points: dirt, corrosion, or oxidation buildup visible on metal surfaces, which can disrupt power flow.
- Low battery: reduced range where buttons work only up close, or inconsistent response across uses; indicator light may be dim if your fob has one.
This flowchart shows key checks for battery orientation, retention, contacts, and low power to diagnose non-response and reduced range in key fobs.
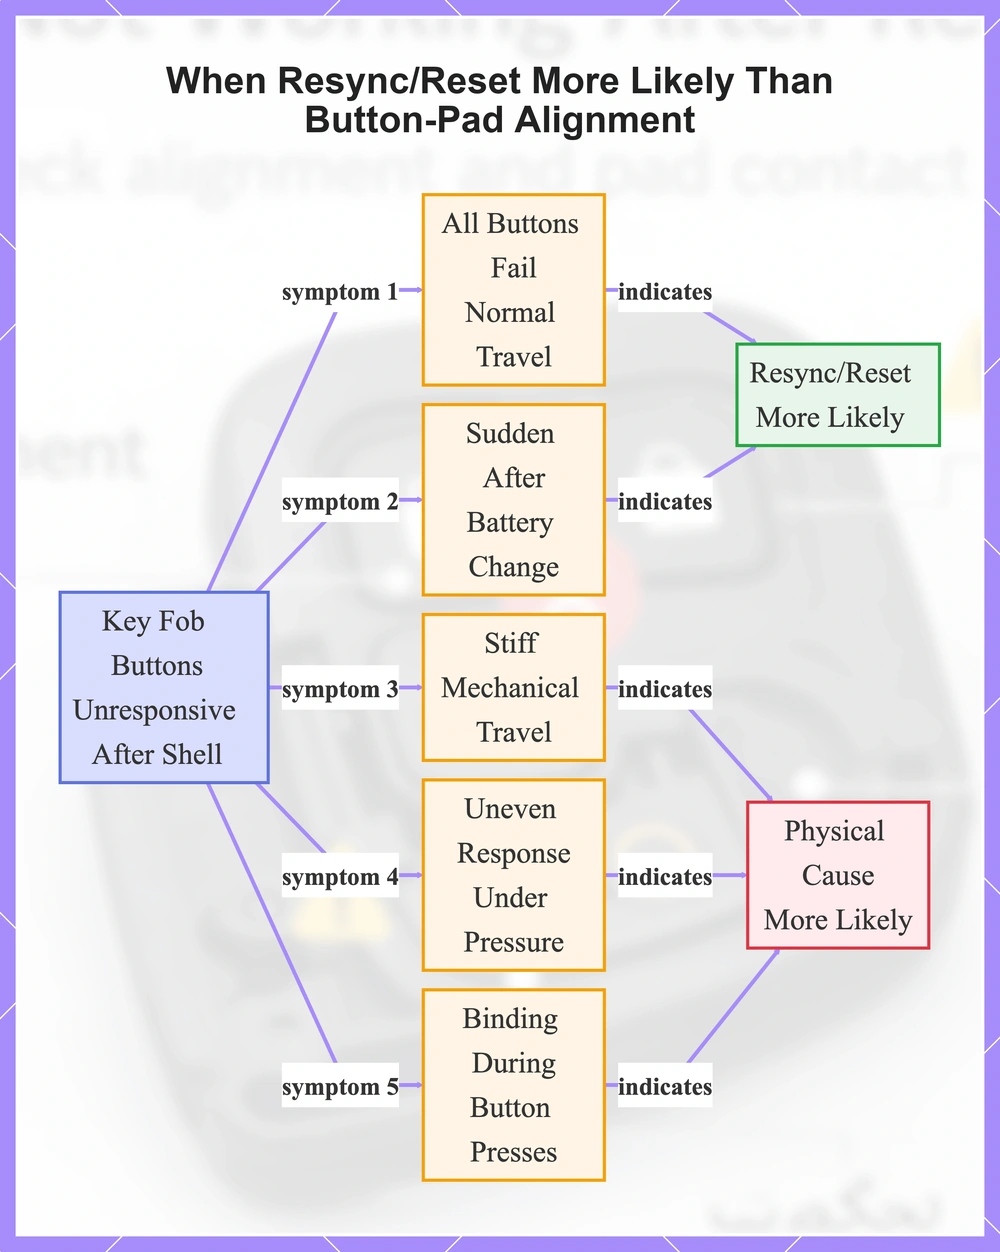
When a resync or reset is more likely than a button-pad alignment problem
Key fob buttons that stop responding after shell replacement don't always mean button-pad misalignment or other physical problems.
Problems like this rarely come from pairing state glitches or resync/reset needs. Mechanical travel feeling stiff, blocked, or binding signals physical causes—prioritize inspection over resync attempts.
- More likely resync/reset: Consistent non-response across all buttons despite normal mechanical travel may indicate a pairing state issue.
- More likely resync/reset: Sudden unresponsiveness after battery change can signal a temporary sync loss.
- More likely physical cause: Buttons feel stiff or jammed, as resync is unlikely to help with blocked mechanical travel.
- More likely physical cause: Uneven response only under physical pressure points to alignment or contact issues rather than pairing state.
- More likely physical cause: Binding during button presses suggests mechanical obstructions rather than resync/reset indicators.
This flowchart identifies key symptoms indicating whether unresponsive key fob buttons after shell replacement signal a resync/reset need or a physical cause like misalignment.
Most common physical causes inside the new car key shell
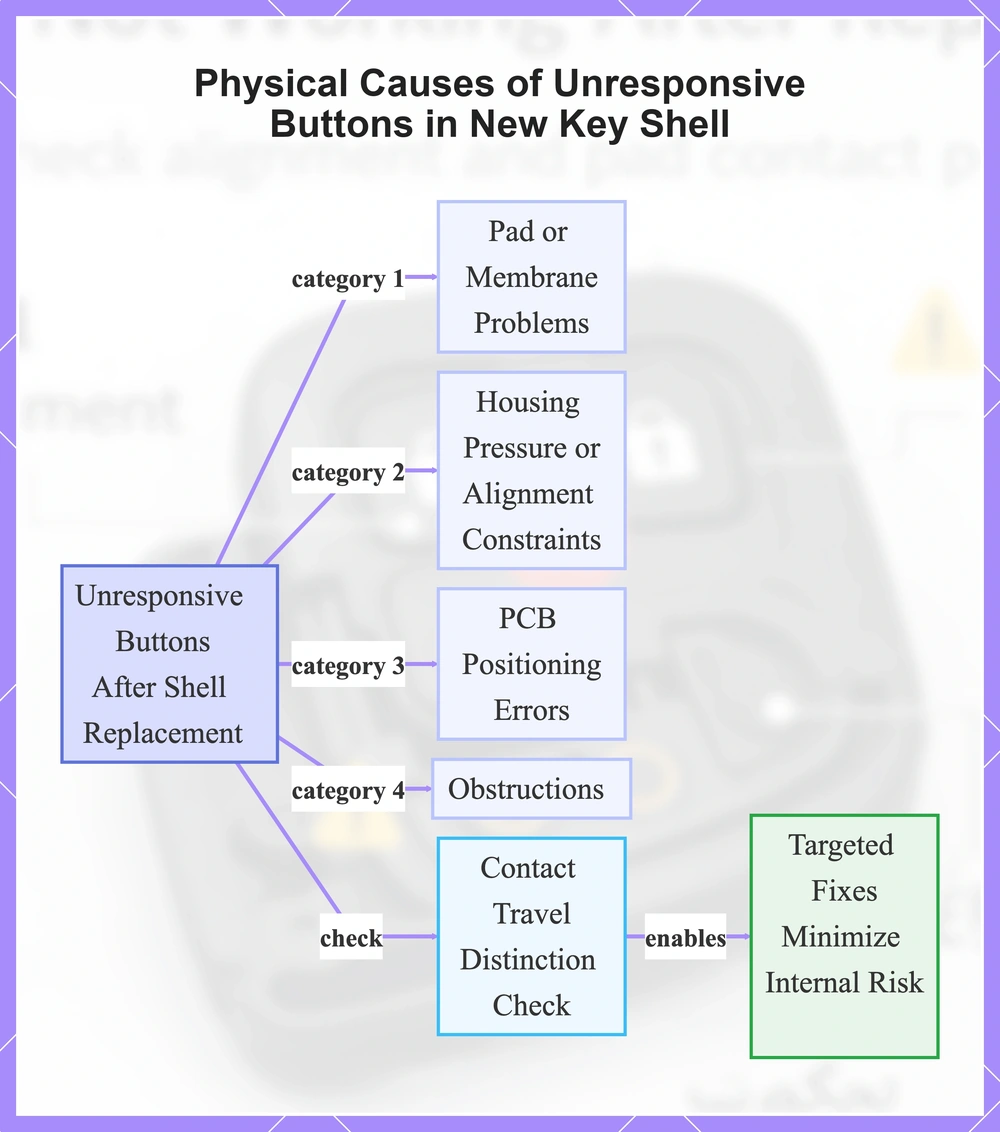
Buttons often stop responding after car key shell replacement due to physical contact or travel problems inside the assembly.
These issues usually fall into four categories: pad or membrane problems, housing pressure or alignment constraints, PCB positioning errors, and obstructions.
Pad or membrane problems disrupt compression and contact. Housing pressure or alignment constraints restrict movement via posts, clips, or screw tension.
PCB positioning errors cause rocking or offset that misaligns microswitches. Obstructions clog paths with debris or molding flash.
Pinpointing the right category supports targeted fixes that minimize risk to internals like the PCB or microswitches.
Categories help because travel issues can block mechanical presses while contact problems stop switch activation—use this Button layout and pad matching criteria split to pinpoint it before disassembly. The bullets below list specific causes per category; later sections cover spotting them.
To distinguish contact vs travel: stiff or jammed buttons point to travel blockage from pressure or obstructions; clicks without response suggest contact failures from pad thickness, compression, or PCB offset.
- Pad/membrane: membrane not seated, pad thickness, pinched edges
- Housing pressure/alignment: alignment posts misaligned, clips not engaged, screw tension from over-tightening
- PCB positioning: PCB rocking, offset from standoffs, unseated supports
- Obstructions: molding flash, debris, warped surfaces
This flowchart shows the four categories of physical causes inside the new car key shell plus the contact vs travel distinction check to enable targeted fixes.
Rubber membrane/button pad not seated or not matching the button frame depth
A rubber membrane or button pad not seated properly often blocks button travel, compression, and contact point activation in car key shells. This can leave buttons unresponsive, depending on shell geometry.
- Pinched edge on the rubber membrane means it got trapped during seating and causes stiff presses with binding.
- Shifted edges of the button pad mean improper seating, which leads to uneven height and inconsistent travel.
- Uneven height across buttons signals button pad depth mismatch with the frame, limiting even compression.
- Visible offset in rubber membrane orientation shows misalignment that creates irregular feel during presses.
- Binding when pressing around the button perimeter gives a quick self-check for trapped button pad sections.
- Buttons feel normal but pressing harder doesn’t help if the contact point stays unreached from poor seating.
Shell alignment posts, clips, and screw tension preventing full button travel
Misalignment of alignment posts, or uneven closure pressure from clips and screw tension, can cause binding that restricts button travel or blocks membrane-to-switch contact.
Shells that close but feel stiff usually stem from this binding caused by seam gap or pressure problems, unlike those that won’t close at all, which point to other assembly issues.
Check these points to spot the problem.
- Alignment posts not seated: look for visible offset or incomplete insertion into mating holes.
- Clips partially engaged: check for overhang or incomplete snap with slight play when pressed.
- Screw tension uneven: one side tighter, causing seam gap variation along the edge.
- Seam gap inconsistent: uneven spacing between shell halves showing binding pressure.
- Shell halves not fully seated: common after a swap, with rocking motion or minor wobble.
Caution: Avoid forcing components, since it can worsen binding on button travel.
PCB and microswitches sitting off-center under the buttons after transfer
The PCB must position microswitches under their buttons for contact during presses. Offset, tilt, or missing supports like standoffs can shift it, causing only some buttons to respond or inconsistent activation.
Foam pieces, spacers, or locating pins from the original setup should go back if they help seat the PCB right, as detailed in the Internal transfer steps. Check for these signs:
- PCB wobbles when gently pressed: not seated on standoffs, so microswitches misalign under buttons and lose contact.
- Visible tilt or uneven height on the PCB: standoffs or posts not level, letting some microswitches miss button alignment.
- Missing spacer or foam under the PCB: leads to offset position where only some buttons work reliably.
- Shifted or absent locating pin: fails to keep PCB aligned, causing spotty microswitch contact on button presses.
- Uneven gaps between PCB and shell: points to poor seating on standoffs and shaky button response.
- Misfit spacers: cause PCB tilt on closure, leaving microswitches off-center so only some buttons activate.
Obstructions and molding defects that create stiff or jammed button movement
Stiff or jammed buttons after a car key shell replacement often signal a physical obstruction blocking button movement rather than an electronics issue. A simple feel test helps distinguish: if the button resists travel entirely with no give, blocked movement from an obstruction is likely; if movement occurs but produces no actuation, the problem leans toward contact failure instead. Common culprits include the following reversible obstructions in the button channel.
- Plastic flashing or molding flash along the button channel edges that restricts travel; inspect edges and wipe gently to clear.
- Debris or residue, such as bits from new shell plastic, lodged in the button channel causing stiffness; brush lightly to remove.
- Warped surfaces on shell halves pressing into the button channel and jamming movement; check for even contact points.
- Misfit button caps that overhang or obstruct the channel path; verify cap seating without forcing.
- Excess residue buildup in tight channel areas leading to jammed buttons; wipe surfaces carefully.
- Minor shell deformation narrowing the button channel; inspect for pinch points around the path.
Caution: Limit actions to inspect, brush, or wipe reversible obstructions only to avoid damaging internals.
Fixes that restore button travel and reliable contact without damaging internals
Use this safe sequence to address common physical causes of unresponsive buttons after car key shell replacement. It starts with gentle reopening checks, covers membrane seating and PCB alignment, then ends with reassembly verification to minimize internal risk. Follow these steps.
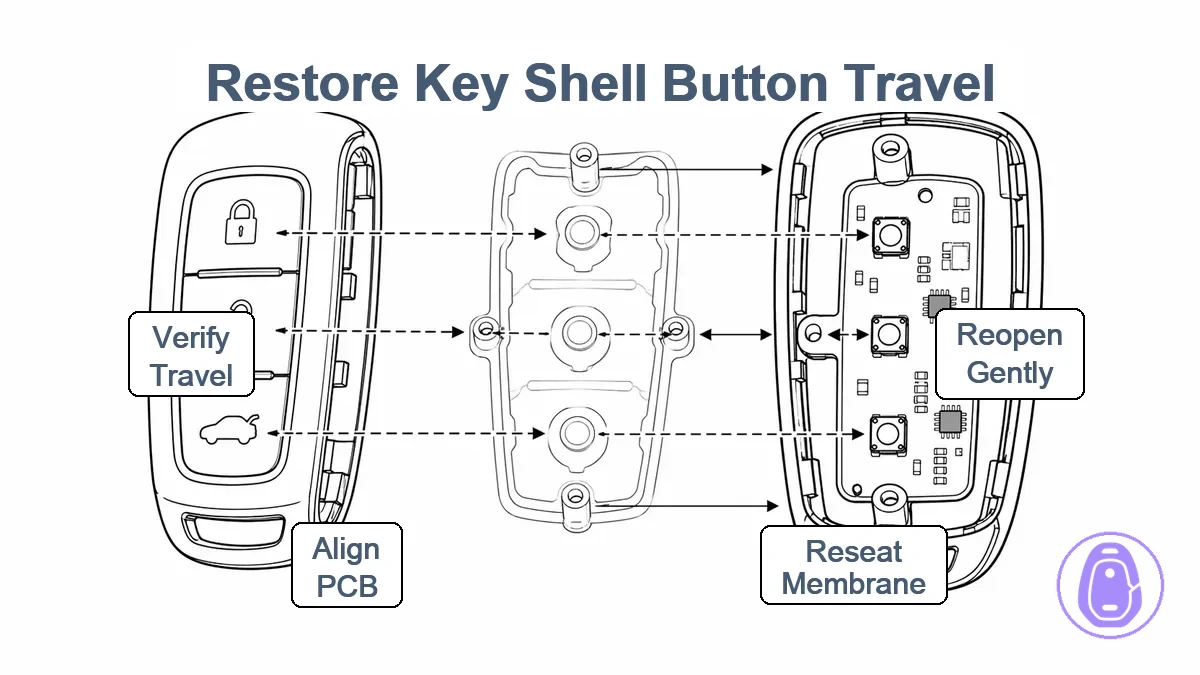
- Gently reopen the shell using minimal force to access internals without stressing components.
- Reseat the rubber membrane by lifting edges carefully and pressing it back into position for alignment and contact with microswitches.
- Align the PCB on its standoffs to reduce offset or tilt that can prevent switch activation under buttons.
- If buttons feel stiff, inspect for obstructions or excessive closure tension that blocks travel; clear reversible debris from button channels and shell cavities.
- If buttons click with no response, verify membrane-to-PCB contact points line up correctly and reseat as needed.
- Balance closure tension by seating clips and alignment posts evenly before tightening screws to achieve an even seam without forcing.
- Verify travel by pressing each button to feel consistent movement before full reassembly.
- Test response using lock, unlock, and start buttons to check if functions register.
- Reassemble if travel and response improve across all buttons.
Validation
- Press buttons gently to test travel for smooth movement without binding or stiffness.
- Activate lock, unlock, and start functions to test response registration.
- Confirm even seam and consistent feel across buttons before final closure.
Re-seat the membrane and confirm the press points line up with the switches
Reseat the rubber/silicone membrane (also called the button pad) so press points align over each microswitch. Check membrane orientation first to match contact points with button positions above.
- Lift the membrane gently and reposition it with edges seated evenly and not pinched against shell walls.
- Align the membrane so each press point sits directly above the matching microswitch below.
- Confirm the membrane lies flat across the assembly without shifts or overlaps.
- Test button presses for equal feel across all positions before closing the shell.
Stiff buttons after closing often indicate a pinched edge or excess tension from poor seating.
Correct closure pressure by adjusting fit points rather than forcing the shell shut
Uneven closure pressure from misaligned alignment posts, unseated clips, or excessive screw tension often causes binding that reduces button travel or prevents membrane-to-microswitch contact. Adjusting these fit points can restore balanced tension for improved button function.
- Inspect alignment posts and clips for proper seating, then gently re-seat any offset ones to eliminate binding points.
- Loosen all screws slightly to release screw tension, then re-tighten evenly in a cross-pattern until clips seated without gap.
- Check for an even seam around shell edges, adjusting clips or posts for uniform closure without forcing.
- Verify no uneven gap remains that could apply excess pressure and cause stiff buttons or inconsistent press depth.
- Confirm that 'buttons work only if pressed hard' is no longer an issue, suggesting over-tension resolution.
- Before final tightening, press each button to re-check smooth travel and even response across all buttons.
Caution: Forcing closure can worsen misalignment and binding.
Clean and inspect contact areas so dirt and residue don’t block button movement
During reassembly, inspect and clear debris or residue from key areas for smoother button movement.
- Inspect button channels for debris and wipe away particles that could block travel.
- Wipe residue from membrane surfaces with a dry cloth for even compression.
- Check shell cavity for grime buildup and remove it gently to cut interference.
- Examine contact areas around button edges for leftover dirt and clean as needed.
- Retest button responsiveness after reassembly once areas dry fully.
When replacing the button pad is the correct fix
Replace the button pad when physical damage disrupts press contact and travel despite repeated reseating.
Replacement fixes compression and switch activation failures that cleaning often cannot handle. Look for these indicators:
- torn membrane with cracks or splits at contact points.
- permanent deformation preventing return to original shape after pressing.
- loss of elasticity, with domes failing to snap back under buttons.
- inconsistent doming causing uneven press response across buttons.
- worn pad surfaces flattened or hardened, reducing contact.
Pad damage means physical wear like tears, while pad mismatch comes from layout or thickness issues.
Replacement pads must match layout and thickness for alignment and press function; persistent failure after correct assembly points to incompatibility or non-shell fault.
When the shell or assembly is the wrong match and you should stop troubleshooting here
Stop conditions signal when button unresponsiveness stems from an incompatible car key shell rather than assembly errors you can fix here. Pursuing fixes on a mismatch risks internal damage or endless adjustments without resolution. Use this split to check for likely incompatibility versus non-shell fault.
Incompatible shells create geometry or layout mismatches that cause persistent problems despite correct seating and mechanical corrections. Non-shell faults involve electronics or other components where shell adjustments show no effect. If buttons feel normal but still don’t trigger, suspect non-shell path. For broader troubleshooting, Back to troubleshooting hub.
| Likely incompatibility | Likely non-shell fault |
|---|---|
|
|
Signs the button layout or pad geometry is incompatible for your key
A button layout or pad geometry mismatch means the car key shell's button positions and pad footprint do not align presses with the underlying microswitches, often leading to no actuation or misaligned press even after reassembly. Small differences in spacing, height, or shape outline can disrupt switch alignment because the press chain needs precise contact, and the shell may look similar overall while the press point differs. These cues signal incompatibility:
- Mismatched button spacing can shift presses away from microswitch centers.
- Different button height can alter travel distance and contact force inconsistently.
- Wrong pad footprint can prevent the rubber membrane from seating under the correct positions.
- Inconsistent feel across buttons, such as some stiff while others click without response.
- Button functions don’t line up, where lock triggers trunk or similar misalignment occurs.
- Footprint shape outline shows overlaps or gaps relative to PCB switches despite visual similarity.
These signs point back to the stop-condition logic as likely incompatibility rather than assembly error.
Signs the issue is electronics-related rather than the shell and button pad
These indicators help rule in a non-shell issue or electronics-related fault when mechanical travel feels normal.
- Buttons are still unresponsive after confirming mechanical travel is normal and reseating components.
- Prior intermittent response occurred before the shell swap, pointing to a likely internal fault.
- Indicator light, if present, stays dim or unchanged despite correct assembly.
- No change occurs in button responsiveness even with a new battery.
- Consistent non-response across buttons continues even after verifying normal travel and alignment.
- Device shows erratic behavior unrelated to button press feel, such as reduced range before the swap.
This page stops at observable indicators, not repairs; once mechanical and basic power checks are exhausted, broader troubleshooting may be needed.